What is a Dedicated Condo
Dedicated Condos is a server that allows you to host your own condo, or a community condo without having to keep the game running. Dedicated Condos also allow other players to use their own inventory and contribute to the condo!
Hosting a Dedicated Condo
This guide will cover how to start hosting your own Dedicated Condo.
You will have to have knowledge on forwarding ports to host a Dedicated Condo.
Dedicated Condos are supported on both Windows and Linux. This guide covers Windows. Linux guide can be found here: Linux Dedicated Guide
Note: Workshop collision currently is not compatible with Dedicated Condos. It is advised to use blocking volumes around them.
Windows
You will need to download the Tower Unite Dedicated Server from steamcmd. The easiest method would be to use our provided batch files that downloads and extracts steamcmd and installs Tower Unite Dedicated Server for you automatically.
Installing
You will need at least 4.0 GB of space.
First, download our helpful batch files. These batch files will assist in downloading steamcmd, Tower Unite Dedicated Server, and be used when updating your dedicated server to the latest release.
After downloading these batch files:
- Create a new folder for your Dedicated Server. You will need at least 4.0 GB of space.
- Place above batch files in that newly created folder.
- Run
SetupTU.bat. You will see a console popup and it'll begin to download steamcmd and download Tower Unite Dedicated Server. - Take a break. It'll take a bit of time to download and install.
- By the end of it, your Tower Dedicated Server folder structure should look like this:
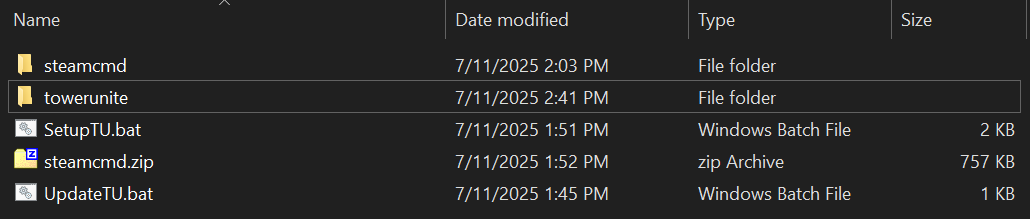
After it's done installing open the towerunite folder and launch TowerServerGUI.exe and go to Windows Launcher for the next steps.
Updating
To update your Tower Unite Dedicated Server, simply run UpdateTU.bat
Batch Files Detail
If you're curious what these batch files do or want to make your own...
They download and extract steamcmd from https://steamcdn-a.akamaihd.net/client/installer/steamcmd.zip
Then they run the following steamcmd install command which installs the Tower Unite Dedicated Server app:
steamcmd/steamcmd.exe +login anonymous +force_install_dir "../towerunite" +app_update 439660 validate +quit
Windows Launcher
We've made a helpful launcher for Windows users, called TowerServerGUI.exe.
This launcher is the easiest way to get your Dedicated Condo up and running without having to edit/create various files by hand.
This launcher handles creating the needed configurations files, along with an condo data importer.

The launcher saves all your server info (name, settings) each time you use it.
Ports to Forward
You will need to open these ports, otherwise players cannot join your condo:
| Ports | Protocol | Description |
|---|---|---|
| 27015-27050 | TCP/UDP | Steam connection ports. |
| 7777-7778 | UDP | Unreal server connection ports. |
Login Tokens
To list your Dedicated Condo on the Condo server list, you will need a Steam Login Token and a Tower Login Token. These tokens assign a static Steam ID for your Dedicated Condo and pair your Condo with your own Steam account.
You will need a Steam Login Token and register your game server to your Steam account.
You will need a Tower Login Token to connect to our condo list.
Steam Login Token
To get a Steam Login Token, complete this form: https://steamcommunity.com/dev/managegameservers
Use 394690 as the App ID.
Tower Login Token
To get a Tower Login Token complete this form: https://moderation.towerunite.com/manage_game_servers.php
Both the Steam Login Token and Tower Login Token are required!
Once you have both tokens, place the Login Tokens into the Windows Launcher.
Login Tokens are essentially your server's password. You should never share these with someone else. If you do, someone can use your login and pose as your dedicated server and potentially get you or your server banned if they use it maliciously.
If you accidentally leaked your tokens, click on "Regenerate" as soon as possible. This will revoke your old tokens and re-generate a new one.
Loading Condo Data
To load your Condo data into your Dedicated Condo, you must first export your condo data from Tower Unite into a .map format.
Exporting From Condo In-game
-
Using the Export feature in the Condo scoreboard under
Saves>Export Condo.This will export the condo to a
.mapformat in yourTower Unite/Workshop/Condo Exports/folder. -
or you can manually rename a
CondoDatafile in your Steam Cloud folder to include the .map extension
Import Using the Launcher
The launcher (Windows only) comes with an Import Condo feature, which will copy your exported condo file into the correct folder for the dedicated condo server automatically.

Moderation
Adding Admins
Using the Launcher, you can add admins by clicking on Admins at the bottom right.

You will need to add your own Steam ID to this admin list.
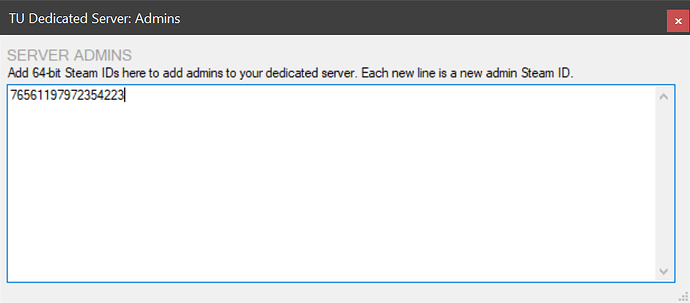
You can add as many admins as you'd like by adding a new line for each admin.
Once you have admin, you can assign per-player permissions within the condo server.
If you'd like to give other players less permissions, then see Per-Player Permissions.
Per-Player Permissions
Once you have given yourself admin, you can adjust per-player permission within the condo scoreboard. From the condo scoreboard, go to Settings > Player Permissions and toggle permissions per-player. This is automatically saved to a file.
Moderator Tag
You can assign the Moderator Tag permission to show a condo moderator tag on players that you have given moderator permissions for other players to see.
Ban List
You can ban players within the scoreboard menu in-game, but you can also ban users manually by placing their SteamID in the TowerBans.ini file. If you do not have one, you will have to create one.
| Platform | Path |
|---|---|
| Windows | Tower/Saved/Config/WindowsServer/TowerBans.ini |
Example TowerBans.ini file:
[Bans]
SteamID=765612345678910,0
SteamID=765612345678910,0
Dedicated Condos also connect to PixelTail's own moderation API.
Logs
When a player joins, leaves, chats, or adjusts condo permissions, we log these actions to Tower/TowerServer_Chat.txt
A log message will contain timestamp, player name (at the time), steam ID, and chat message or action.
Example:
09/06/2025 23:01:02 | MacDGuy (76561197972354223): JOINED THE SERVER
Mature Servers
Yes, you can host 18+ servers. In order to do this, you must add "18+" to your condo title. The Windows Launcher has a checkbox that adds this to your condo title for you.
Again, you must follow our rules and label your condo title with the keyword "18+". If you host mature content without this tag, your condo will be delisted.
Condo Content Rules / Prohibited Content
You must follow our rules while hosting any content.
Condo Rules: Rules
Advanced Configuration
Launching: Windows Batch File
For advanced users, the StartTowerCondo.bat contains:
TowerServer.exe /Game/Maps/C_Condo -log -Port=7777 -nosteamclient -QueryPort=27016
Advanced Info
/Game/Maps/C_Condois the map name to load. You can see a list of condo maps here: Condo List.- -log enables logging.
- -Port is to change the port from the default 7777
- -nosteamclient is required to run the server without Steam.
- -QueryPort=27016 is required to be 27016 to avoid interaction with your Steam client on the same machine. If you don't set this, you won't be able to play Tower Unite on the same machine as the dedicated condo!
Parameters
The following parameters can be passed into the server executable using a batch file on startup.
Overriding game server port
-Port=7778
Overriding Steam master server port
We recommend not using port 27015 or it will not allow you to play the game on the same machine.
QueryPort=27016
Binding to a specific server IP address
-MULTIHOME=public-ip-here
e.g. -MULTIHOME=8.8.8.8
Required: Runs the server on the same machine as the game client
-nosteamclient
Custom TowerServer.ini file, useful for multiple servers on one machine
-TowerServerINI=CustomTowerServer.ini
Depending on which platform you're using, the file will be loaded from a specific directory.
| Platform | Path |
|---|---|
| Windows | Tower/Binaries/Win64/CustomTowerServer.ini |
Manually Importing Condos To Dedicated
First, export your condo data.
You will need to copy exported .map file into the Dedicated Condo's Tower/Condos/ folder.
You need to create a folder for each Condo (i.e. Condos/C_Condo/) inside Tower folder.
The .map must be named the same as the condo map you will be loading (i.e. C_Condo.map or C_Studio.map).
The full path should look like:
Tower/Condos/C_Condo/C_Condo.map
or
Tower/Condos/C_Studio/C_Studio.map
Custom Condo Filename
If you want to load from a custom .map file, you can by changing the CondoFile parameter in TowerServer.ini.
| Platform | Path |
|---|---|
| Windows | Tower/Saved/Config/WindowsServer/TowerServer.ini |
This changes the filename for the map you are loading into, but is still within the Condo's folder. For example, if your condo is on Smooth Dirt:
CondoFile=MyAwesomeCondo
will set the server to load the file:
Condos/C_SmoothDirt/MyAwesomeCondo.map
Debugging Issues
Unable to initialize SteamGameServer API error
This issue occurs if your steam client files did not copy correctly. The Windows Launcher will copy these files for you, but if that doesn't work or if you are not using the launcher, you will need to copy these files manually.
Navigate to Engine\Binaries\ThirdParty\Steamworks\Steamv139\Win64\
Copy these files:
steam_api64.dll
steamclient64.dll
tier0_s64.dll
vstdlib_s64.dll
to Tower\Binaries\Win64\
Unable to see Condo on Condo server list
This can be multiple issues.
-
Ensure your account does not have an active ban by going to Ban Appeals and check if you have an active condo ban.
-
"Disconnect - Disconnecting from AGC". If you're getting this error, ensure you have setup the Login Tokens correctly.
Condo data fails to load
If your condo data is not in the correct folder, you will see the error: FAILED TO LOAD CONDO DATA
Make sure you check if the folder name and the .map file name matches the condo map you are loading.
Players unable to join
Ensure you have Forwarded Your Ports and check any firewall rules that may be blocking connections.