Creating a Zombie Massacre Map
Using the Condo tools, this guide will cover how to create a Zombie Massacre map with the Zombie Massacre Map Maker.
Prerequisites
Before you can get started creating a Zombie Massacre map, you will want to get an understanding of how to edit Condos and spawn Condo items.
You will also be using the IO inventory menu, which is a tab on the bottom inventory.
Intro
The Zombie Massacre map maker uses the same editor as the Condo but with Zombie Massacre-designed items.
When making a Zombie Massacre map, you can use:
- Co-op Editing (invite friends to help build in real-time)
- Canvases (custom images)
- Materials/Surfaces
- Workshop Sound Emitters (custom sounds)
- Condo I/O (custom gameplay logic)
- Condo items (for decoration purposes)
- Workshop Models (custom models)
Opening the Level Editor
To access the level editor, go to the Main Menu of Tower Unite. Near the bottom, there is a Workshop Editor option. From there, click on Map Editor.
Since Tower's Map Editor supports multi-player editing, it'll ask you if you would like to host for Public, Friends-only, or Singleplayer.
Once loaded in, you will see a popup. This popup has similar information to what we'll cover in this guide.
Click on Zombie Massacre as your Selected Editor by clicking on the Zombie Massacre icon then click Okay.
You will see an empty grid environment.
Accessing Zombie Massacre Editor Tools
While holding Q, access the bottom inventory and click on the Condo IO / Game Items tab.
Then, click on the Zombie Massacre tab.
You will see a list of Zombie Massacre specific items such as the Zombie Spawner, Helicopter Spawn, and Sub-Objectives.
Map Creation
Creating Your Zombie Massacre Level
Player Spawn Points
To spawn players in Zombie Massacre, you MUST place down a Custom Spawn Point. This is where players spawn.
You can set spawns to only be active for specific days by editing the ZM Days setting on the Custom Spawn Point.
Make sure you create a few spawn points so players don't spawn on top of each other.
Zombie Spawners
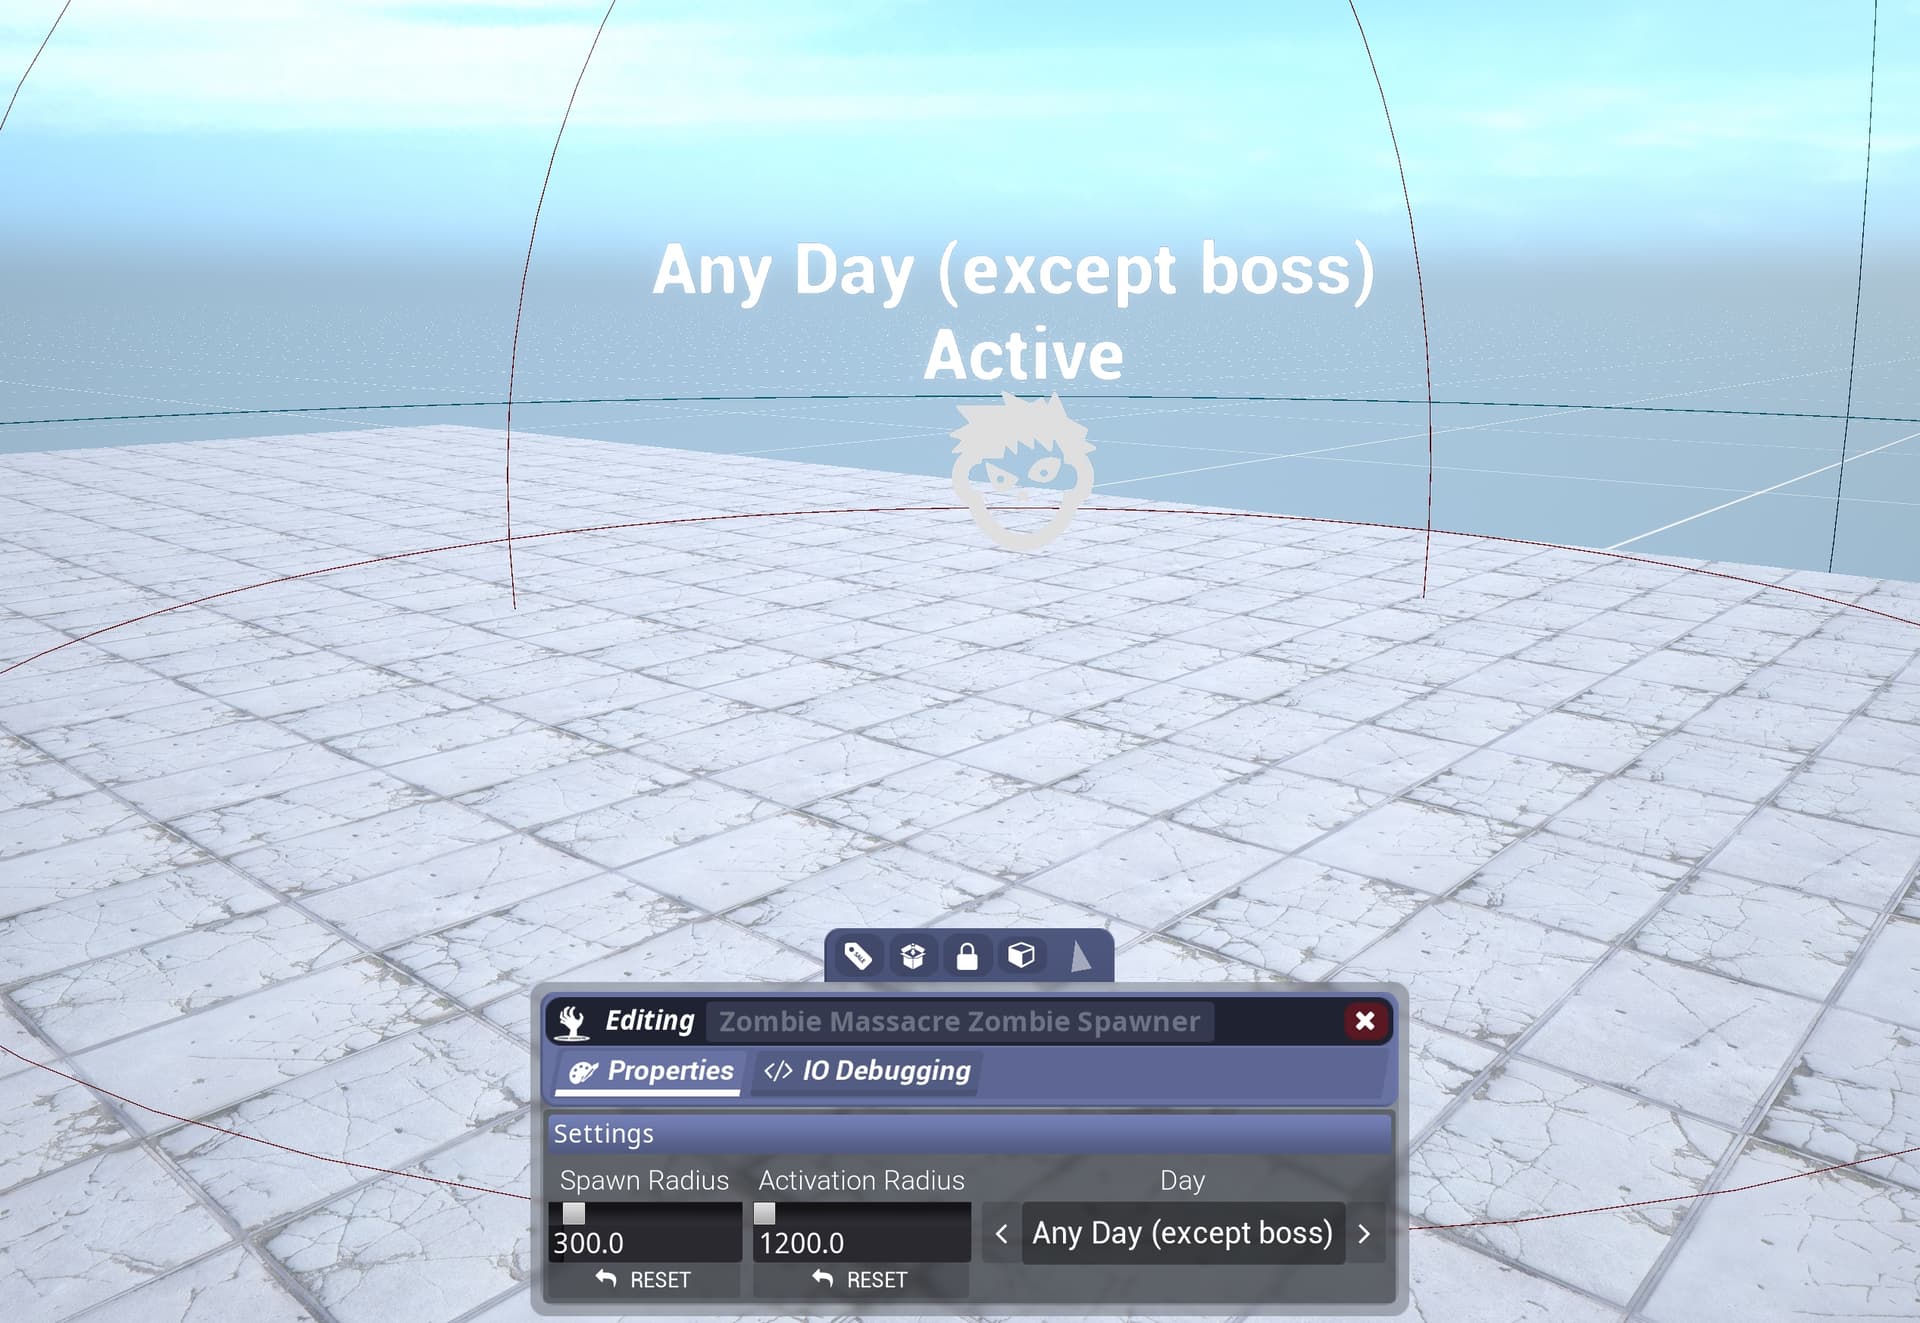
For Zombies to exist in your custom map, you will need to spawn a Zombie Massacre Zombie Spawner item.
This spawner will automatically spawn zombies.
There are two radiuses of the spawner: a radius for where zombies can spawn (Spawn Radius), and a radius for when the spawner is active (Activation Radius) if players are within it. You can adjust them to fit within your map.
You can place as many Zombie Spawners as you'd like. You can assign the spawner to be only active on certain days.
You can also turn off and on spawners using IO with the Activate and Deactivate inputs.
Manual Spawn
You can also manually spawn a certain zombie type using IO and using the SpawnZombie feature. Keep in mind this only spawns one of the certain zombie, not change the entire spawner to that type.
Boss Spawner
Boss spawner is required to place down in your map somewhere. In official maps, we make a specific area of the map just for the boss battle so players and the boss have space. This is recommended for custom maps as well, but up to you.
To place down a Boss Spawner, use the Zombie Massacre Boss Spawner item.
You can adjust which boss you'd like to spawn. Currently the choices are:
| Boss | Description |
|---|---|
| Random | Randomly pick a boss |
| Spider | The giant spider queen. She rains down acid pools, shoots trapping webs, and has an army of spiders. |
| TRex | The king of Dinosaurs resurrected. Locked and loaded with missiles and dual wielding miniguns. Field raptors are deployed to assist alongside. |
Escaping
Survivors need a way to escape and you'll need to provide them one in your custom map. The default escape is the Helicopter.
Helicopter
To place down a helicopter landing, use the Zombie Massacre Helicopter Landing item.
Two helicopter guides will spawn with it in the air. You can move these guides with the gizmo tools (click on them while holding Q) to reposition where the helicopter flies in from and where it exits from.
You can test your helicopter landing by editing the landing item and click on Test.

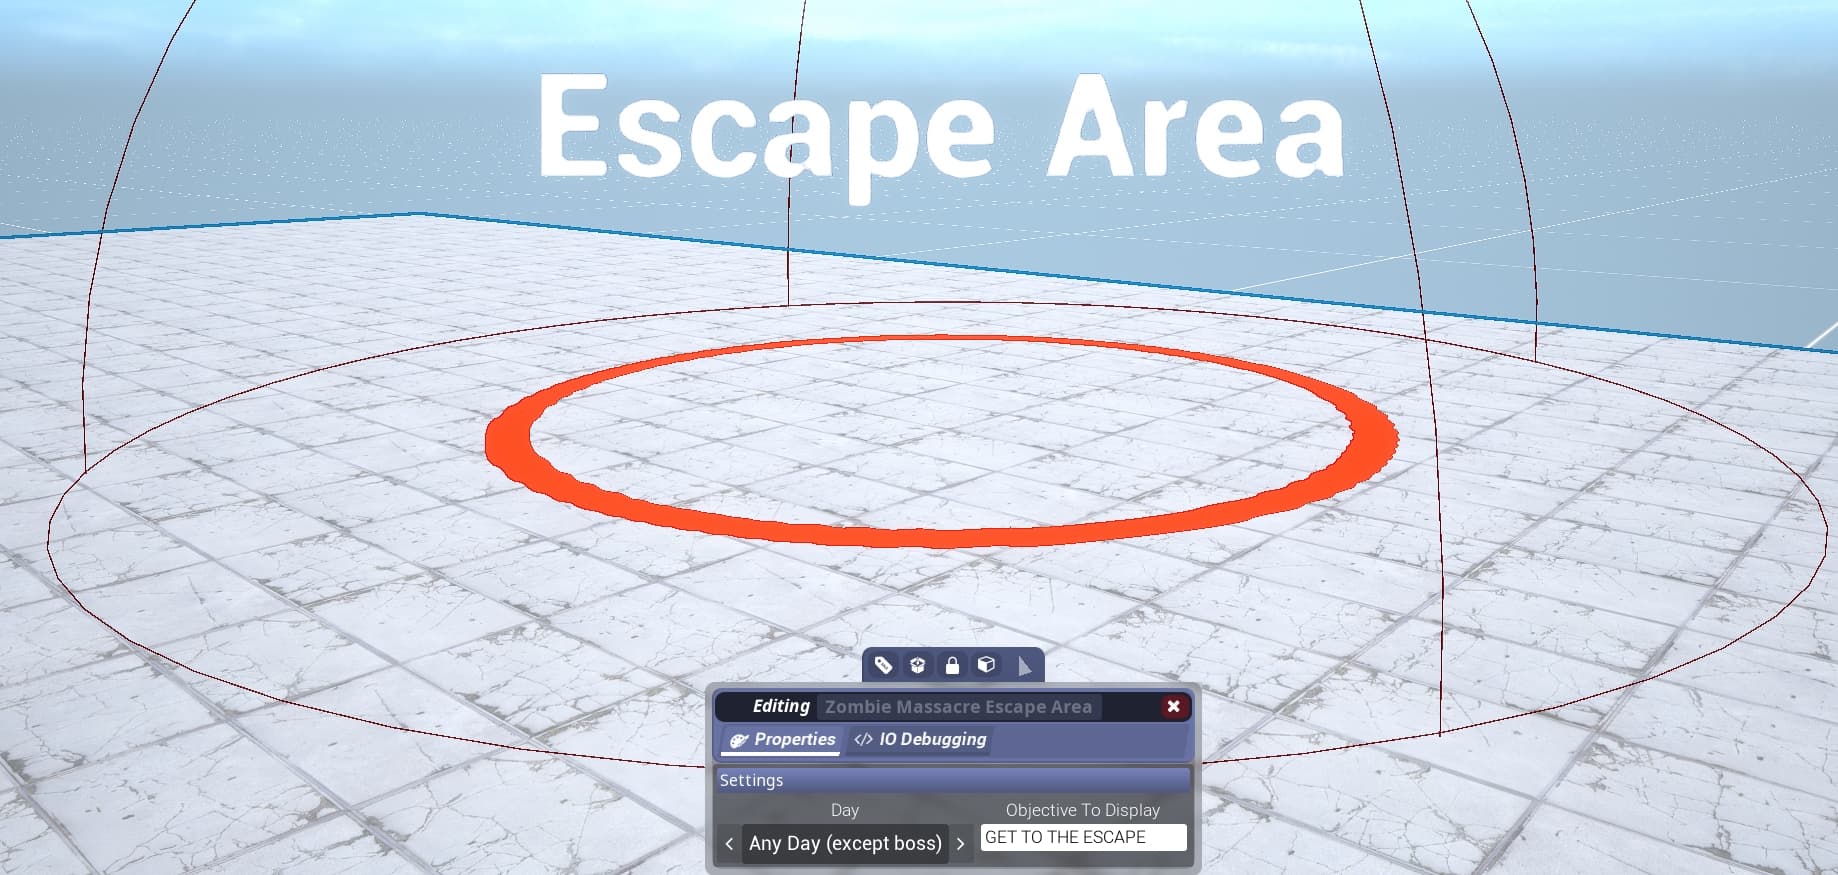
Custom Escapes
Built a map that doesn't fit the helicopter?
You can create your own custom escape by using the Zombie Massacre Escape Area item.
This item comes with no visuals, but will direct players towards it when its time to escape for the day. It is expected for you to place it around something that players would associate with as an escape path such as a boat or a door.
You can edit the escape to set your own custom text, such as "Escape To The Boat", or "Escape To The Safe Room".
There are IO outputs on the custom escape for when the players are ready to escape for the day and when a player has entered the escape.
You can optionally set a camera to switch to when players have escaped by assigning a Camera IO item to the camera setting.
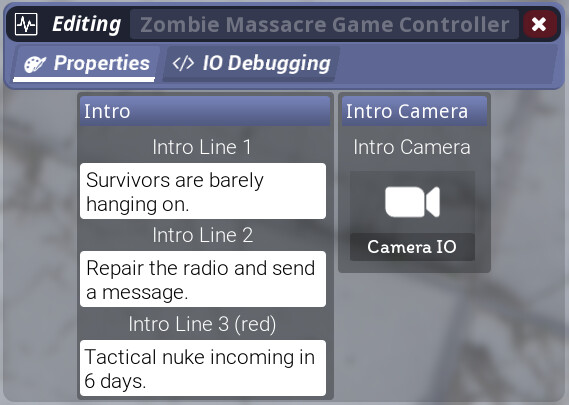
Intro
You can create your own intro with text by using the Zombie Massacre Game Controller.
By editing its settings, you will see three lines of text you can use to inform players the overall objective of the level. In Zombie Massacre the first and second line is typically the objective or location, and the last line is in red.
You can set the intro camera by placing down a Camera IO item and assigning the Camera IO to the intro camera setting.
Intros last exactly 10 seconds long.
Gameplay
Sub-Objectives
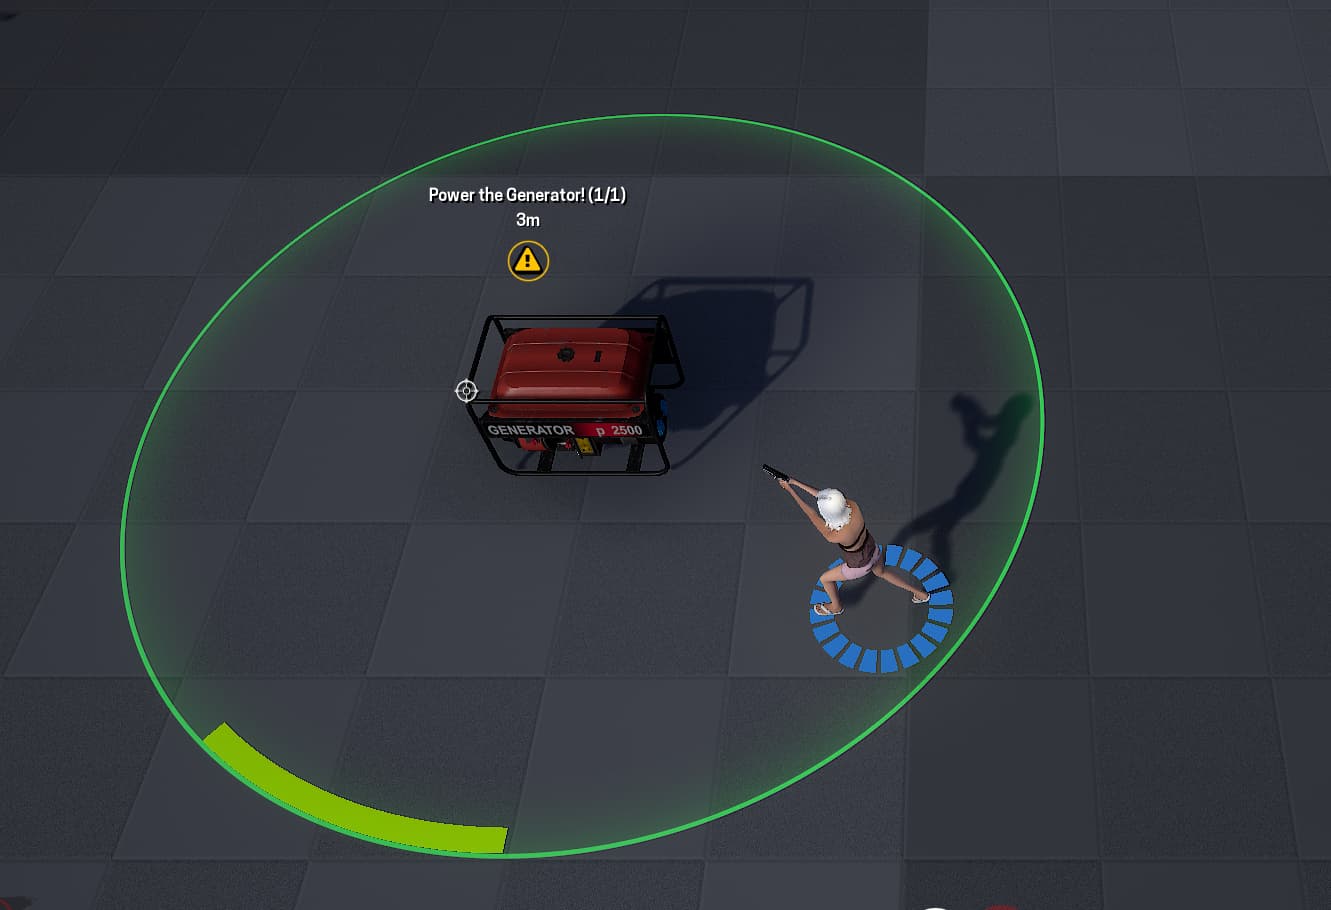
Sub-objectives are new to Zombie Massacre as of the map maker update. They are areas that players must be within for a set amount of time before they can complete the objective. Sub-objectives give players extra points for the day and also help push players into other parts of your map.
You can setup sub-objectives in multiple ways by using the Zombie Massacre Sub-Objective items.
| Item | Description |
|---|---|
| Sub-Objective | A blank sub-objective that you can customize fully. |
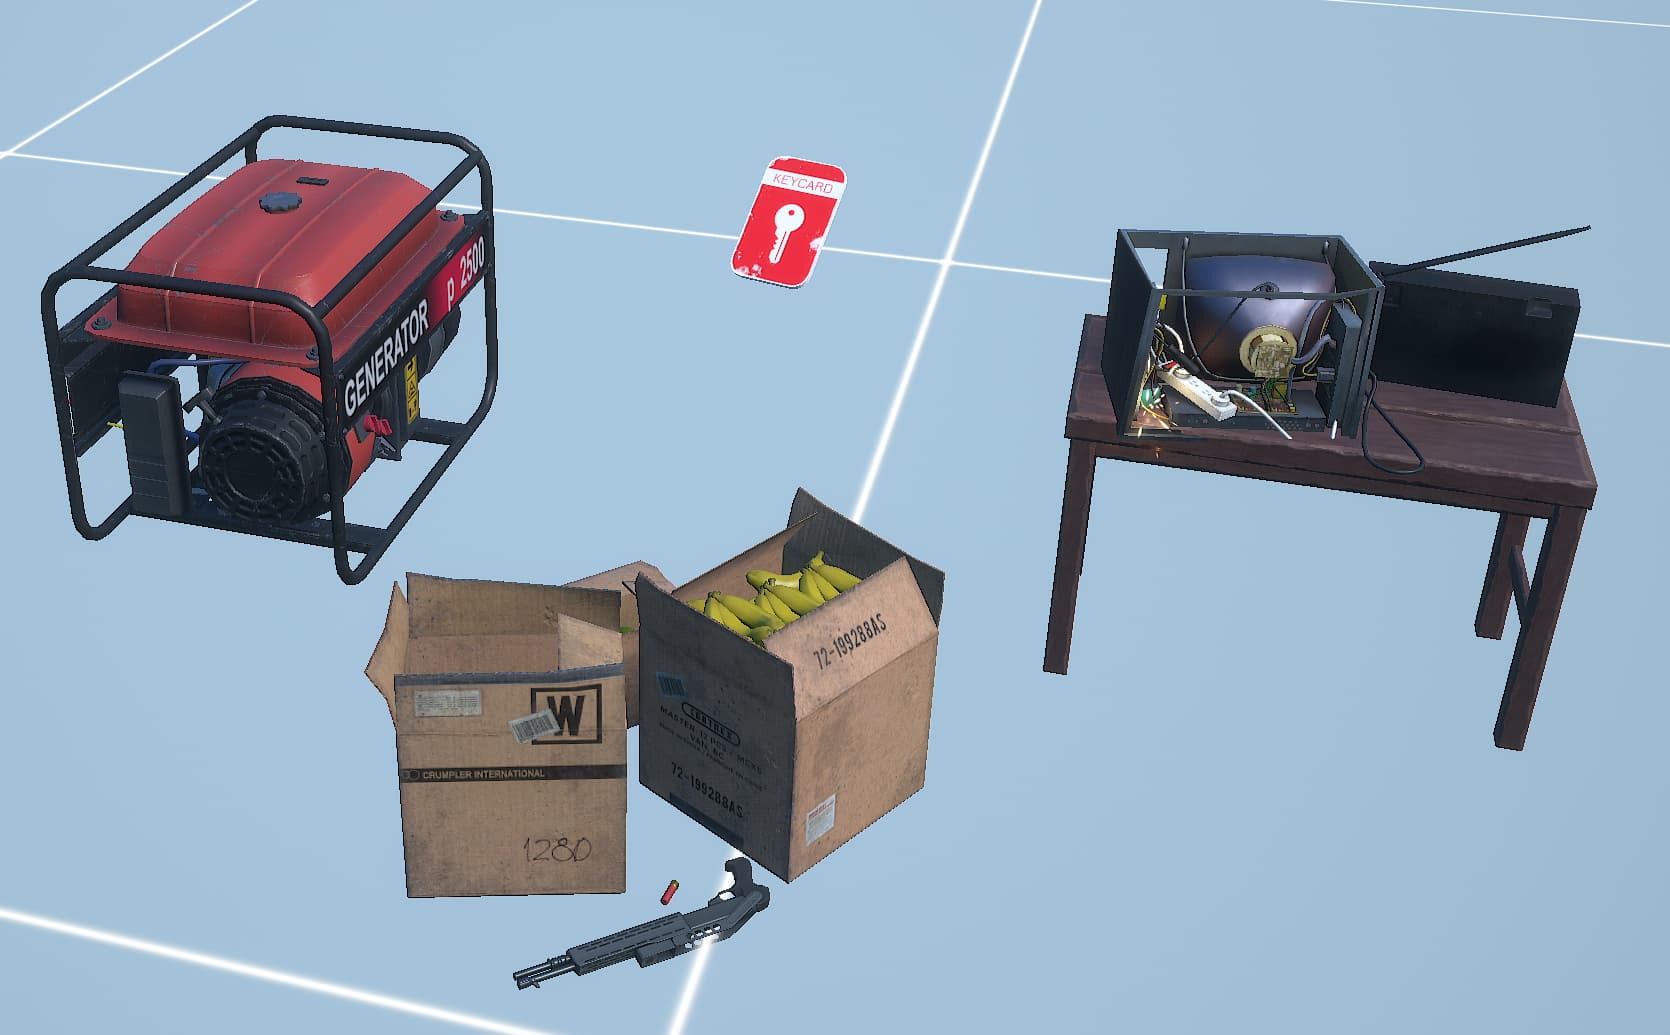
| Sub-Objective Generator | A generator that powers on after time. |
| Sub-Objective Radio | A radio that turns on after time. |
| Sub-Objective Supplies | Supplies that survivors collect after time. |
| Sub-Objective Keycard | A keycard that unlocks after time. Note: This is not the same as the keycard pickups. |
You can adjust when a sub-objective begins for the day. By default, sub-objectives start 15 seconds into the day. Space out your sub-objectives carefully, or use IO (such as Trigger Volumes) to start them.
If players do not complete a sub-objective, the game will reset them at the end of the day. You can optionally have them fail permanently by adjusting the settings.
Customizing Sub-Objectives
You can use the provided sub-objectives, but you can still adjust a lot about the sub-objective.
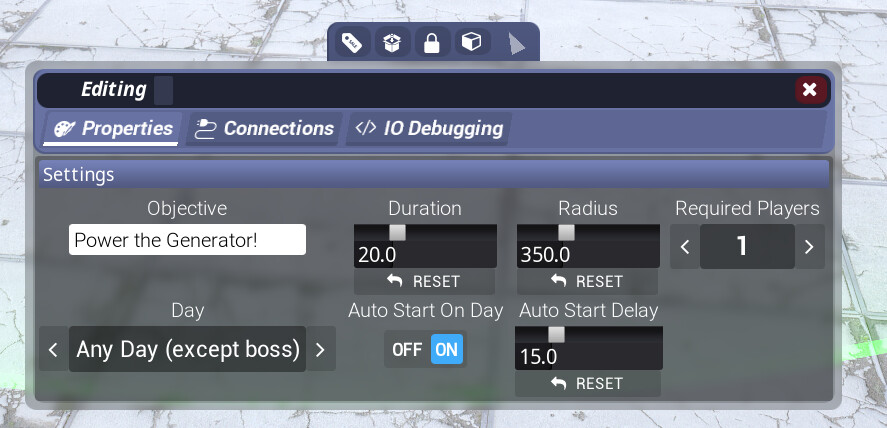
| Setting | Description |
|---|---|
| Objective | The text that shows to players what the objective is. |
| Duration | How long players need to be inside the sub-objective area to complete it. |
| Radius | How far/close players need to be inside the sub-objective |
| Day | The day the sub-objective activates on. |
| Auto Start On Day | Auto starts the sub-objective on the matching day. |
| Auto Start Delay | How long in the day before the sub-objective starts. |
| Required Players | How many players must be within the sub-objective to progress it. |
Controlling Sub-Objectives with IO
If you don't want to use the auto start feature of the sub-objectives, you can start and stop sub-objectives with IO easily. Using the Start will start the sub-objective. Reset will stop the sub-objective and clear all progress on it.
There are also outputs to hook into from the sub-objectives: OnSuccess, OnFailed which happen when the sub-objective was successfully completed or failed. And OnProgressStarted, OnProgressStopped which happen when players are actively progressing the sub-objective and when they are no longer.
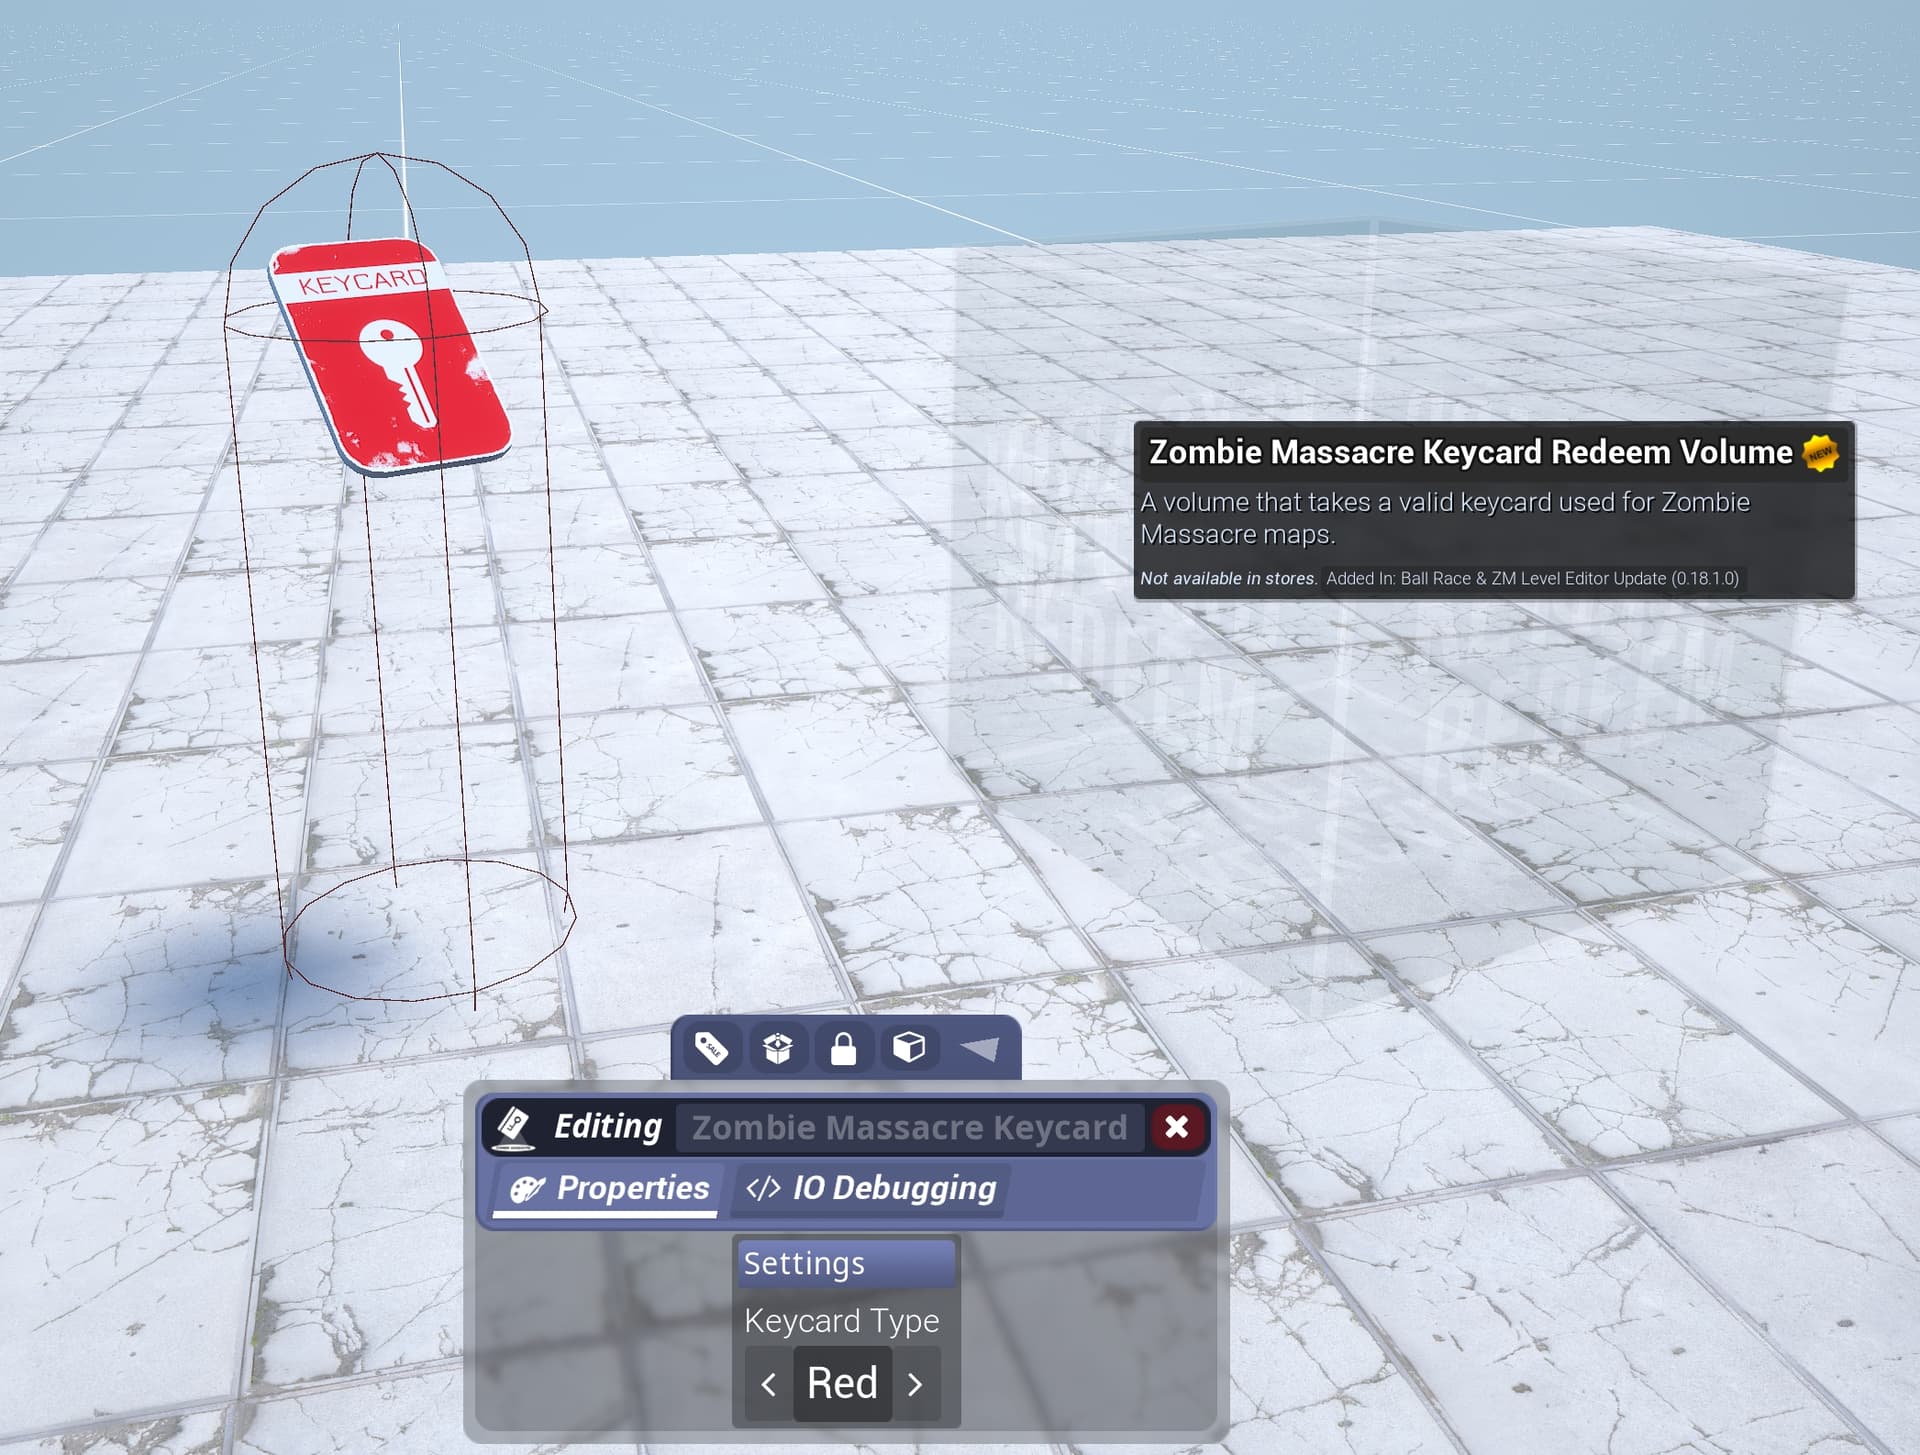
Keycards
Keycards are also new to Zombie Massacre as of the map maker update.
These are placeable pickups that all survivors hold on to when collected by a survivor. You can use these as currency to award players for exploring and to award them by opening previously closed pathways.
You can place a keycard in your map by spawning the Zombie Massacre Keycard item.
There are 4 different colored keycards, and players can hold to as many as you give them in your map. If one player grabs a keycard, all players can use it. Unless manually cleared, keycards persist between days.
Redeeming Keycards
Players can redeem keycards by touching a Zombie Massacre Keycard Redeem Volume placed in the map.
Place down a keycard redeem volume and edit which type of keycard is accepted.
Use the connector tool to connect the volume's OnSuccess IO output to a locked door or anything you'd like!
The redeem volume will only take the exact keycard and only call success if the survivors have a keycard.
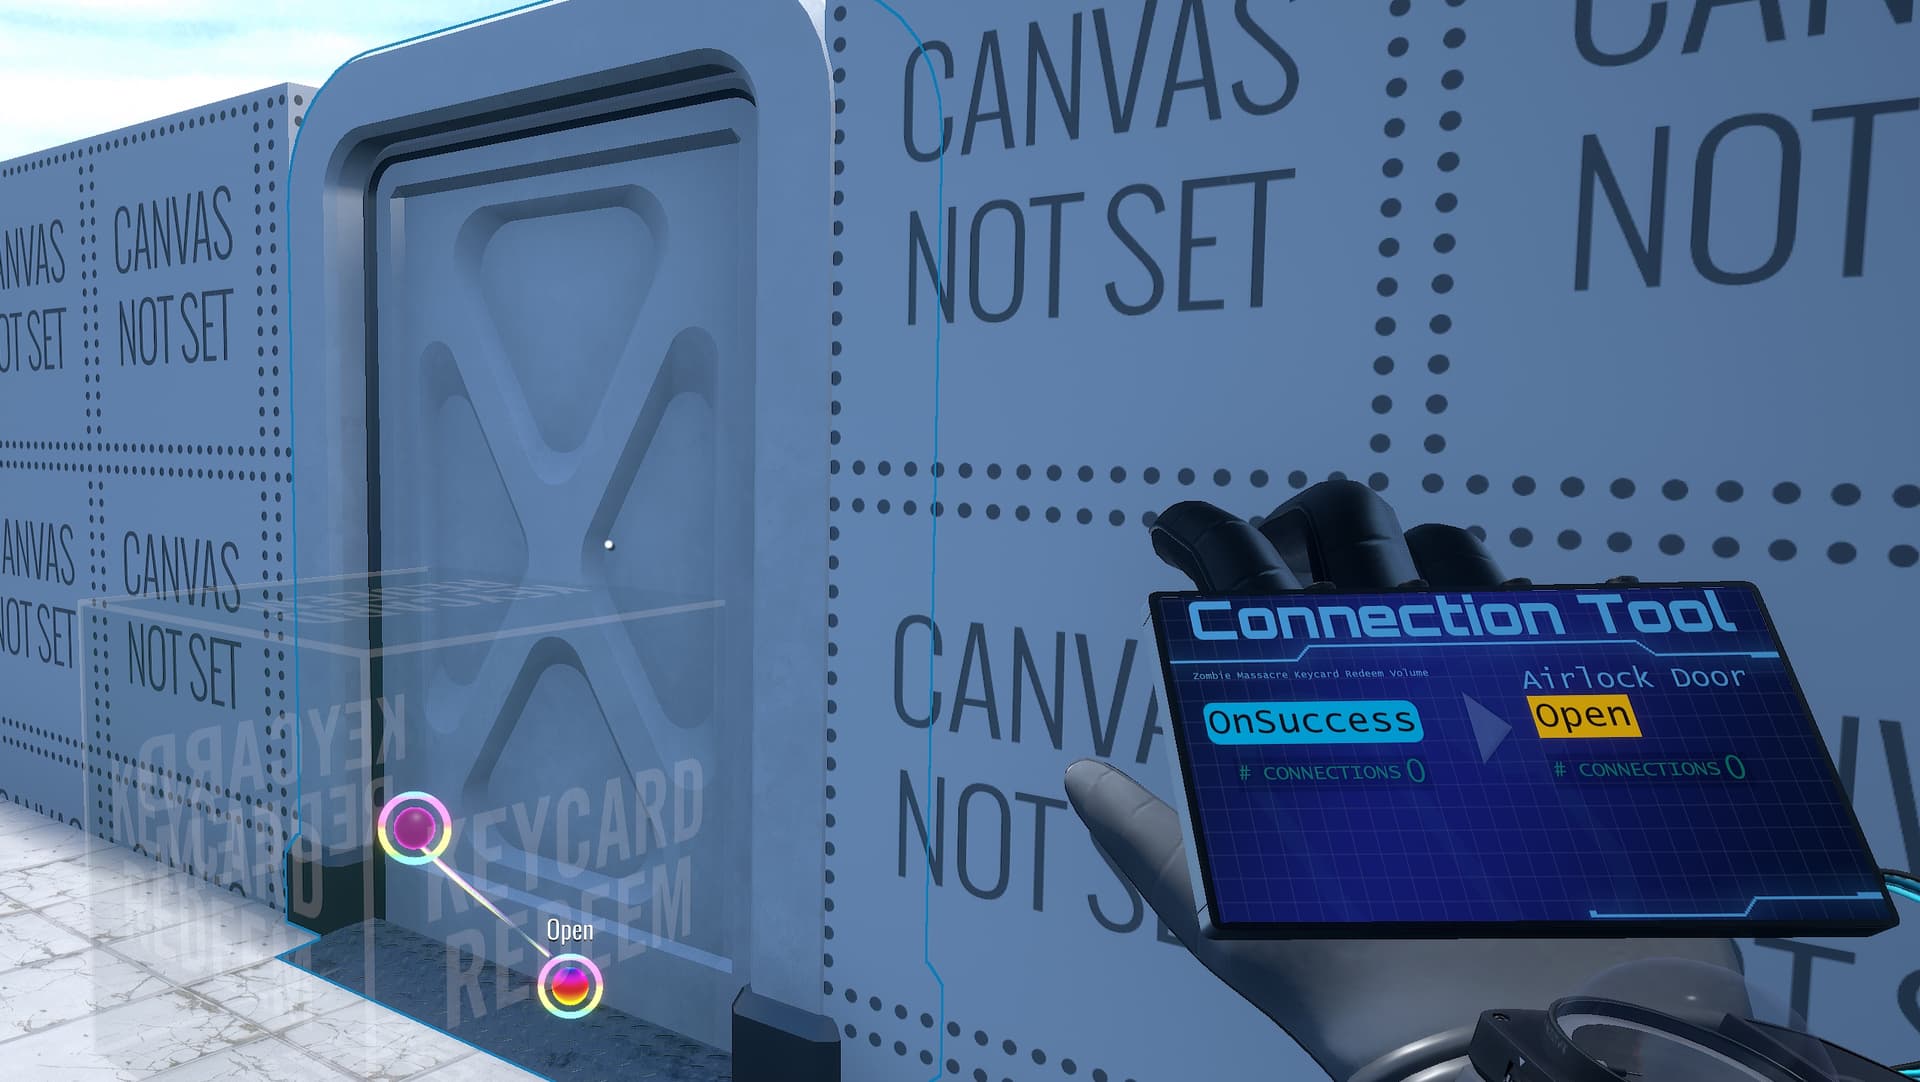
Keycard Example
Clearing Keycards
Unless manually cleared, keycards persist between days.
You can use IO to clear all keycards collected by the players by using the Zombie Massacre Game Controller (covered next) and call ClearAllKeycards based on game events or other IO logic.
Buttons/Doors
New to Zombie Massacre as of the map maker update, players can use interactables in Zombie Massacre.
Players can face towards an item such as a button or a door and press the use key to use them.
You will need to place buttons at eye level, though.
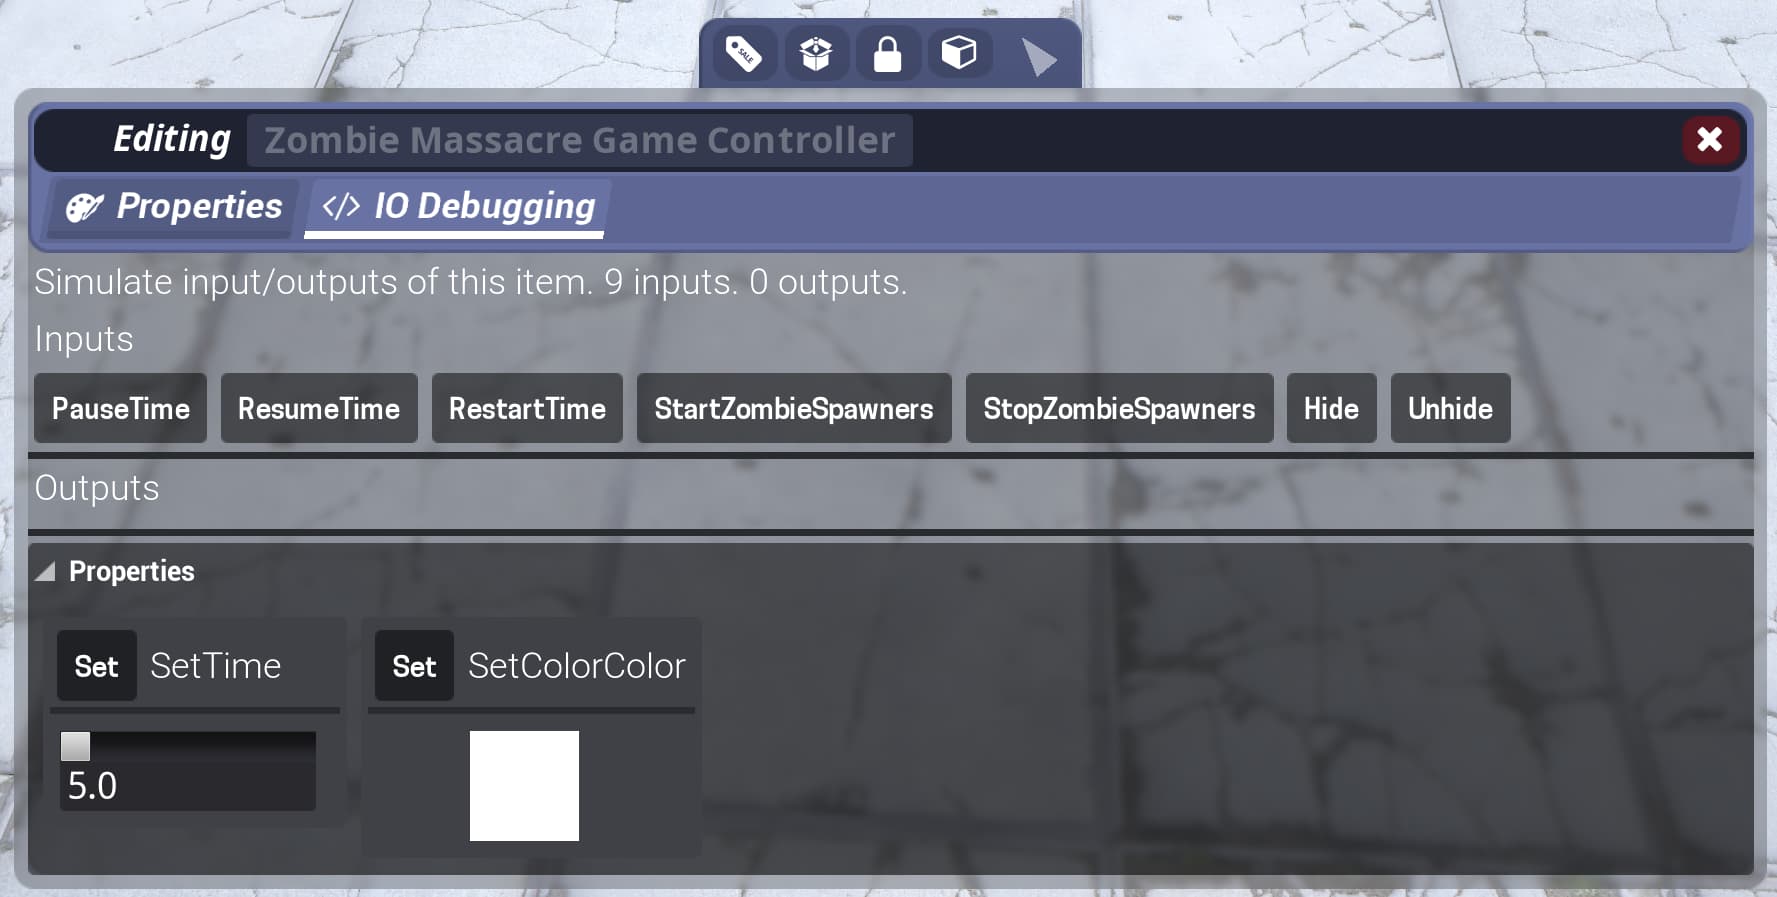
Game Controller
You can use the Zombie Massacre Game Controller to adjust certain game events.
You can pause the day timer, restart the day timer, set the day timer, clear all keycards, and pause/resume zombie spawning.
This item is for advanced use only, you do not need to use it.
Game Events
You can react to game events in IO by using the Game World Events Module. For Zombie Massacre, you have the following events:
| Event | Description |
|---|---|
| ZM OnDay1 | When Day 1 starts. |
| ZM OnDay2 | When Day 2 starts. |
| ZM OnDay3 | When Day 3 starts. |
| ZM OnDay4 | When Day 4 starts. |
| ZM OnDay5 | When Day 5 starts. |
| ZM OnDay6 | When the Boss battle day starts. |
| ZM OnSuccess | When players have survived for the day. |
| ZM OnFailed | When players have failed to survive the day. |
| ZM OnZombieKilled | When a zombie has killed by a player. |
You can use these events to do anything you'd like to your map, or you can use them to clear keycard progress on day failure.
You can also use the OnZombieKilled event to keep track of how many zombies have been killed with a counter IO item.
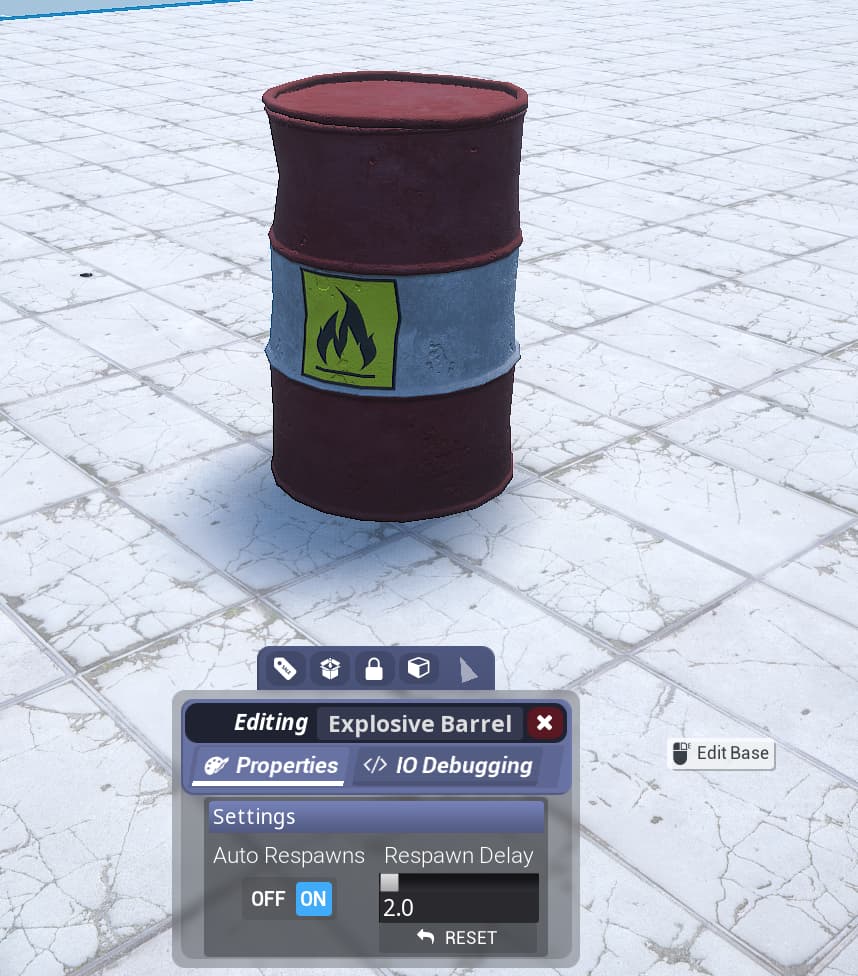
Explosive Barrels
To give your map some flare, you can place down explosive barrels in your Zombie Massacre map. These barrels can be unlocked at Rob's Imports.
Level Design
Camera Hide Module
In Zombie Massacre, you may want to hide objects that get in the way of the camera or hide the roof top of an interior to help player see better.
You can do this by using the Camera Hide Module. This module can be connected to any item and it will automatically hide/unhide the connected items should they obstruct the view of the top down camera.
Visuals/Decoration
Decoration
The Zombie Massacre Map Maker supports any Condo item for decoration. You can browse Tower Express for items to get an idea of what's available.
You can use anything a Condo can: canvases, primitives, lights, and even workshop models.
Sky Lighting / Weather
You can adjust the time of day, sun/moon position by pressing Tab then going to Map Settings > Day/Night & Weather
You can also adjust the weather, and the weather will save as the default for your map.
If you want even more control over the sky, place down a Sky Volume found in the Condo IO/Game Objects tab. The Sky Volume will allow you to adjust fog settings, horizon colors, and more.
Post Processing
You can adjust post process settings to enhance your level's atmosphere by placing down a Post Processing Volume found in the Condo IO/Game Objects tab.
Sounds
Just like in Condos, you can easily add sounds and sound atmosphere to your map.
There are two types of Sound Emitters: Sound Emitter, and Workshop Sound Emitter. They both share the same functionality, but the Workshop Sound Emitter will allow you to use custom sounds that have been uploaded to the Workshop Sound Pack workshop.
You can access both of these items in the Condo IO/Game Objects tab.
Music
Custom Music
To add your own custom music, spawn a Game World Music Manager, which can be found in the Condo IO/Game Objects tab.
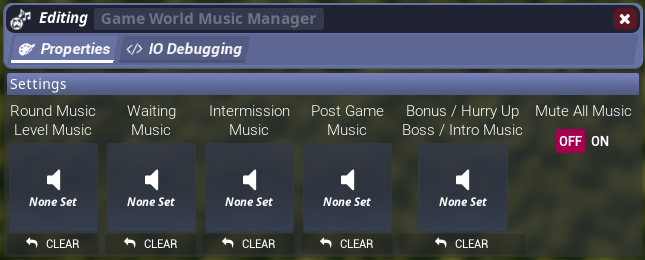
Edit the Game World Music Manager and you will see music slots. You can override the music with any custom Workshop Sound Pack, or you can create your own.
Zombie Massacre Music
Intermission music is used during Upgrades.
Bonus/Hurry Up music is used during Boss Battles.
Saving and Loading Maps
At any point of time, you can save your map to a file. You can then load this map at a later time.
The editor automatically saves your working map every so often, and before the game closes. But if you are working on multiple maps at once, you can save and load your maps to files.
To save/load your map, hold Tab and at the top of the scoreboard there is a Save button and a Load button.
Saving
Clicking on Save will ask you to provide a map name and then the editor will save your map.
Your maps are saved in the game's main folder /Tower Unite/Workshop/Maps/ and they are saved in a .map format. You can access this folder by opening Steam and right clicking on Tower Unite > Properties > Browse Local Files.
Loading
Clicking on Load will show a file prompt. If you do not see the file prompt - make sure you are in borderless or windowed mode as fullscreen is not compatible.
Loading From Condo Data
Did you happen to make your map in your Condo? You can load Condo map data just like a map.
First you will need to get your Condo save data. It is stored in:
C:\Program Files (x86)\Steam\userdata\ <SteamID3> \394690\remote\Condos\
where <SteamID3> the last part of your Steam ID. If you are the only Steam user who has used your machine, there should only be one folder. If you are not sure, you could try going by the last date modified.
There are folders for each Condo (ex. C_SmoothDirt) and inside of them there is a CondoData file. Copy that file to another folder, then rename the CondoData file to CondoData.map.
Once you have done that, you can import your condo data as a level!
We are hoping to streamline this process more in the future.
Testing Your Map
Zombie Massacre must be tested within the Zombie Massacre game.
Testing with Map Editor
You can do a full map test to see how your map will work in Zombie Massacre.
Hold Tab then click on on the big green Play button.
During testing, you can switch days with the top left testing HUD. Simply hold Tab to enable your mouse to access it. You can also toggle zombie spawning with the Space key.
After you are done testing, you can click on the End button and it will take you back to the editor.
Uploading Your Map
Uploading your map is the same process as uploading a Condo, but with a quick check process beforehand.
Hold Tab then click on on the Upload button.
Checking Your Map
Before you can upload your map, the editor will run a check of your map to ensure gameplay elements are there.
For Zombie Massacre, it will check that the map has:
- custom spawn points
- zombie spawners
- boss spawner
- a helicopter or escape spawn
You can manually check your map before uploading by holding Tab then clicking on on the Check Map button.
Uploading
After the check is completed, the upload panel will popup.
Click on Create New.

It will ask you to provide a file name to save your map as.

Name and Description
Follow the upload panel, it'll ask you to set a title for your map, along with a description.
Thumbnail and Images
Then, it'll ask you to take three screenshots, using the in-game photo screenshot tool.
If you want to upload a custom thumbnail, click on Set Thumbnail below the first image and select an image file. Thumbnails should be 800x400 resolution.
Tags
Select a Difficulty tag that best represents your map's difficulty. This can be updated in the future if you find out that players find your map easier or harder after they have played it.
Select a Map Theme. You can select up to three themes that best fit your map.
Select a Map Size.
Content
If your map uses Canvases, the map editor will pack them with your map as textures. Look over these Canvases and ensure they do not break any of our Workshop Rules.
Upload
Finally, you are here. Take a deep breath. Be proud of what you have created. You have come so far, and now you can share your creation with the world! :confetti: :cheers: :party:
If you want to make your map immediately public, click the Publish & Make Public check box then hit upload, otherwise leave that unchecked and you can make it public from the published Workshop page.
You can update your map's title, description and images on the published Workshop page. Unfortunately, you cannot update your tags or thumbnail without doing an update to your map.
Upload Errors
If your map failed to upload to the Steam Workshop, it will give you an error message:
- Nothing: Sometimes this just happens. Try uploading once or twice again, before investigating further.
- Title / Description: Large bodies of text in the title or description field may prevent the upload. Keep it short or empty and you can update it freely afterwards.
- Maintenance / Downtime: Sometimes Steam Workshop is taken offline and will be unable to accept uploads. If this is the case, try again in 15 minutes or so.
- Bans: If you have recently had an item removed from the Workshop, you may be limited by a temporary Workshop ban, even if it wasn't a Tower Unite item.
Updating Your Map
Updating your map is a similar process to uploading your map.
While in the level editor, hold Tab then click on on the Upload button.
After the check is completed, the upload panel will popup.
Click on Update Existing.
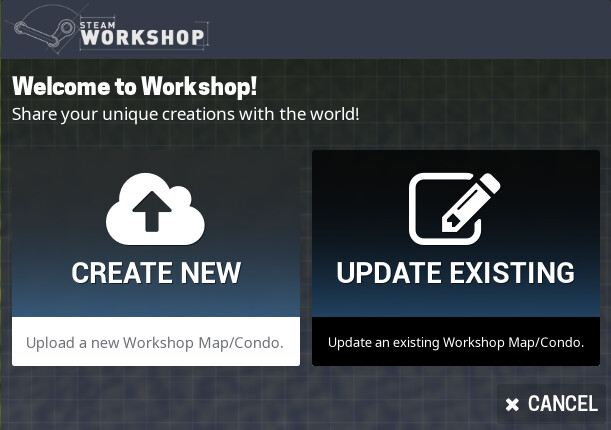
It will show a list of your uploaded maps. Click on the map you wish to update.
Then, it will ask you to provide a file name to save your map as. If you are just updating your thumbnail or tags, click on Skip Saving - Only Update Info.
At this point the upload panel will load all the existing information for your map.
Go through the upload panel step by step. You can skip updating certain parts of the update process if you do not want to update those.
When you have made your changes click on the Upload tab and click on Update.
Your map is now updated!
Payouts / Unit Approval
Newly uploaded maps by default will not have payouts enabled. This is to prevent abuse.
Each day, our staff will review newly published maps. If your map is approved for units payout, you will see a gold Unit symbol next to the map in-game for every workshop map list (including votemap).
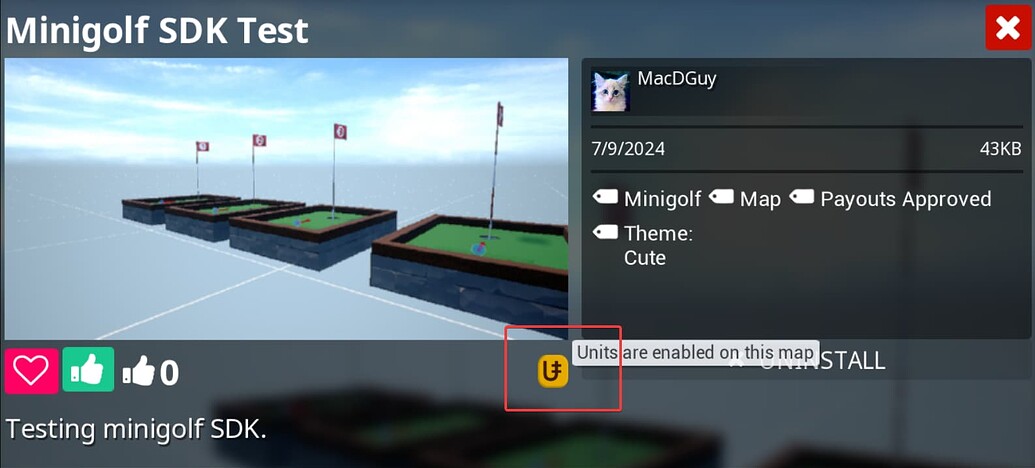
If your map has not been approved, that might mean that is it too abusive or our staff has not reviewed it yet.
If you update your map after being approved, you will not need to be approved again. Staff can remove the approval if upon recent review the map needs further adjustments.
The approval process for Zombie Massacre is done by:
- checking if the map is not a obvious Unit farm
- checking if the map has proper spawn points and zombie spawn points
- checking if the map is complete-able and playable
Closing Statements
This editor uses multiple features that have been in development for several years and will only continue to improve and grow.
We are very excited to see what you come up with! Have fun, and see you on the greens!