Creating a Minigolf Map
Using the Condo tools, this guide will cover how to create a Minigolf map with the Minigolf Map Maker.
Prerequisites
Before you can get started creating a Minigolf map, you will want to get an understanding of how to edit Condos and spawn Condo items.
You will also be using the IO inventory menu, which is a tab on the bottom inventory.
Intro
The Minigolf map maker uses the same editor as the Condo with Minigolf-designed items.
When making a Minigolf map, you can use:
- Co-op Editing (invite friends to help build in real-time)
- Canvases (custom images)
- Materials/Surfaces
- Workshop Sound Emitters (custom sounds)
- Condo I/O (custom gameplay logic)
- Condo items (for decoration purposes)
- Workshop Models (custom models)
Opening the Level Editor
To access the level editor, go to the Main Menu of Tower Unite. Near the bottom, there is a Workshop Editor option. From there, click on Map Editor.
Since Tower's Map Editor supports multi-player editing, it'll ask you if you would like to host for Public, Friends-only, or Singleplayer.
Once loaded in, you will see a popup. This popup has similar information to what we'll cover in this guide.
Click on Minigolf as your Selected Editor by clicking on the Minigolf icon then click Okay.
You will see an empty grid environment.
Accessing Minigolf Editor Tools
While holding Q, access the bottom inventory and click on the Condo IO / Game Items tab.
Then, click on the Minigolf tab.
You will see a list of Minigolf specific items such as the Hole/Flag, Starting Pad, and Course Pieces.
Minigolf Pieces
The bulk of the Minigolf map maker is working with various Minigolf pieces. These pieces form the Minigolf course and are designed to lock together. They have many customization options such as length, steepness, railing settings, and more.
All pieces have Tile Size, Wall settings, Grass settings, and Mirror support. Many also have Length, and Steepness settings.
| Piece | Description | |
|---|---|---|
 | Straight Piece | Standard straight forward piece, steepness can be adjusted. |
 | Flat / Hole Piece | Designed for the hole, has drop hole support and various shape settings. |
| End Piece | An end cap piece. |
 | Ramp | Straight ramp with curve settings. |
 | Outer Corner Piece | For creating corners, comes with angled and curved walls. |
 | Inner Corner Piece | Used to fill inside of corners, used commonly with Outer Corner Piece. Various shape settings. |
 | S Bend Piece | S-shaped piece. |
 | Intersection Piece | Used to fill different intersecting pieces. Has angled wall settings. |
 | Half Pipe Piece | A half-pipe shape. |
 | Loop | A loop-de-loop with adjustable sizes. |
 | Curve Path | Curved shape with different curve settings. |
 | Side Shift Piece | Similar to straight piece but used to shift the direction of the course. |
A couple good pieces to start with when designing is the Straight Piece, Outer Corner Piece, End Piece, and Hole Piece.
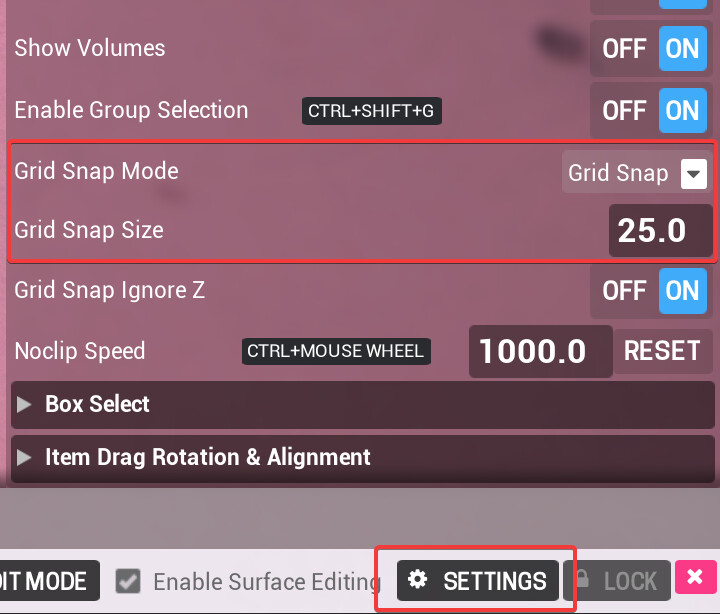
Important: Grid Snap
All Minigolf pieces are designed to snap together when on a 25 unit grid.
You will need to enable grid snap mode while placing pieces together. By default the level editor will enter grid snap mode when you start it up.
To enable Grid Snap go to the Inventory settings at the bottom inventory: hold Q then click on Settings. Then change Grid Snap Mode to Grid Snap. Ensure Grid Snap Size is set to 25.
Tip: You can also switch to Grid Snap Mode with a hot key while dragging the piece (default F).
You will know you are in Grid Snap Mode when you see a 3D grid while dragging a piece.
Piece Customization
All pieces have Tile Size, Wall settings, Grass settings, and Mirror support. Many also have Length, and Steepness settings.
You can also change the grass color, grass type, railing color, railing type, and wall surface (with canvas support).
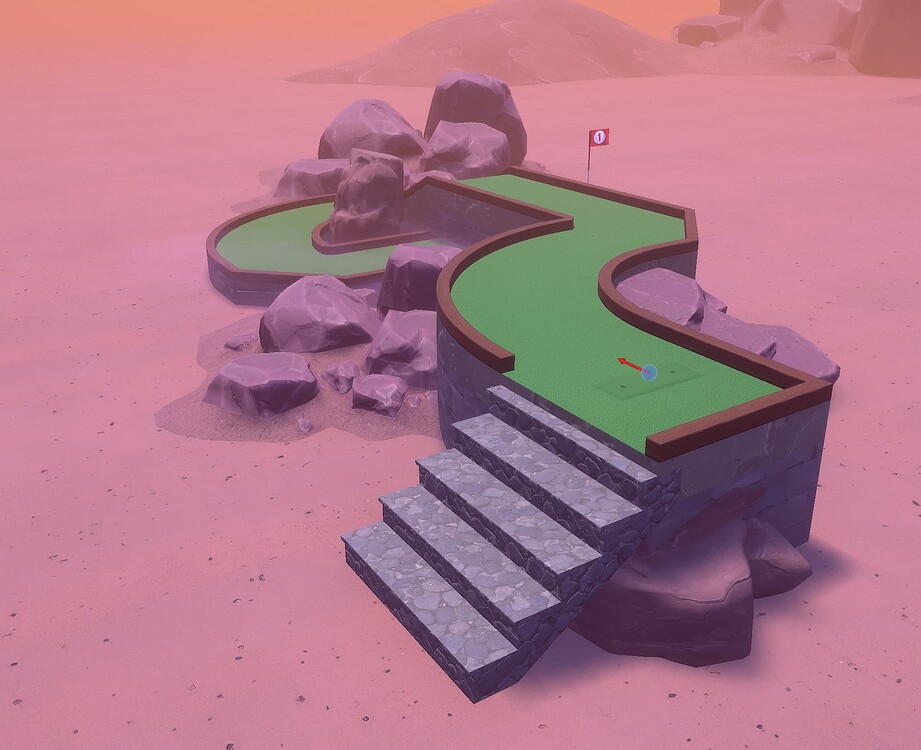
Map Design
Designing Your Course
Before you start placing down pieces, you will want to use the Grid Snap feature. You can access this by going to the bottom inventory then click on Settings > Grid Snap. Make sure you are on the 25 grid scale while working on Minigolf courses.
To start off, place down a Straight Piece and a Ramp Piece. You will also need a Hole Piece for the hole itself.
Placing a Start Pad
Once you have a course designed out, you can place down a Start Pad. This is where the course will begin from.
You will need to set the Hole Number, Par, and Hole Name.
You will need at least 9 Start Pads for a 9 hole course and 18 Start Pads for an 18 hole course.
Placing a Flag Hole
If you haven't already, place down a Hole Piece somewhere in your course. Once that is placed, spawn a Minigolf Flag and drag it into the Hole Piece. It will snap to it for you, even if you are slightly off.
You will need to set a Hole Number. You can also color the flag a different color if you'd like to.
Tip: The Hole Piece also has hole dip settings.
You will need at least 9 Flag Holes for a 9 hole course and 18 Flag Holes for an 18 hole course.
Out of Bounds
After your course design is done, you will need to setup out-of-bounds and in-bounds volumes around the course, so when the ball goes off course, it'll be marked out-of-bounds.
You handle out-of-bounds with different volumes:
- Out of Bounds Volume
- In Bounds Volume
- Water Volume
Out of Bounds Volume
The Out Of Bounds Volume will mark the ball out-of-bounds when the ball hits it. It also has an option for Water hazard.
To start off, place an Out of Bounds Volume at the floor of your level and have it cover the floor as much as possible.

In Bounds Volume
Next, you will need to cover your course with In Bounds Volume.
The In Bounds Volume marks the ball out-of-bounds only when the ball is outside of the volume. This one is designed to cover your entire hole to prevent players from getting outside of its area, or going to another course.

Tip - Hiding Volumes:
If you want to edit your course after placing bounds volumes, you can hide volumes by going to your bottom inventory and at the right click on Settings > Show Volumes and turn them off. The volumes will still be there, but visually hide so they don't get in your way.
Water Volume
You can also use the Water Volume as the Water Volume will automatically mark the ball out-of-bounds when the ball hits the water.
Intro Camera
Now that you are finished with your course, you will need to setup an Intro Camera.
Place down a Minigolf Intro Camera. Edit it and set the Hole Number to match the hole you are making the intro camera for
The Intro Camera will automatically point towards the Flag Hole with the matching Hole Number.
Adjusting The Camera
You may also need to adjust the Spline of the Intro Camera to cover the length of your course.
While editing the Intro Camera, click on Spline, and you will see the path the camera will take as it plays its animation. You can move around the path points to where you'd want. If you are having trouble, see Working With The Spline Editor for more information.
Previewing Intro Camera
To preview the Intro Camera, edit the Intro Camera (or click on Properties if you are already editing it) and click on Test Camera.
Gameplay
Boosts
To boost the ball or set the ball's velocity, you can use the the Boost Volume found in the Condo IO/Game Objects tab.
The Boost Volume has settings to add a force in a direction and set a force in a direction. It also has built-in sound effects and FX (togglable).
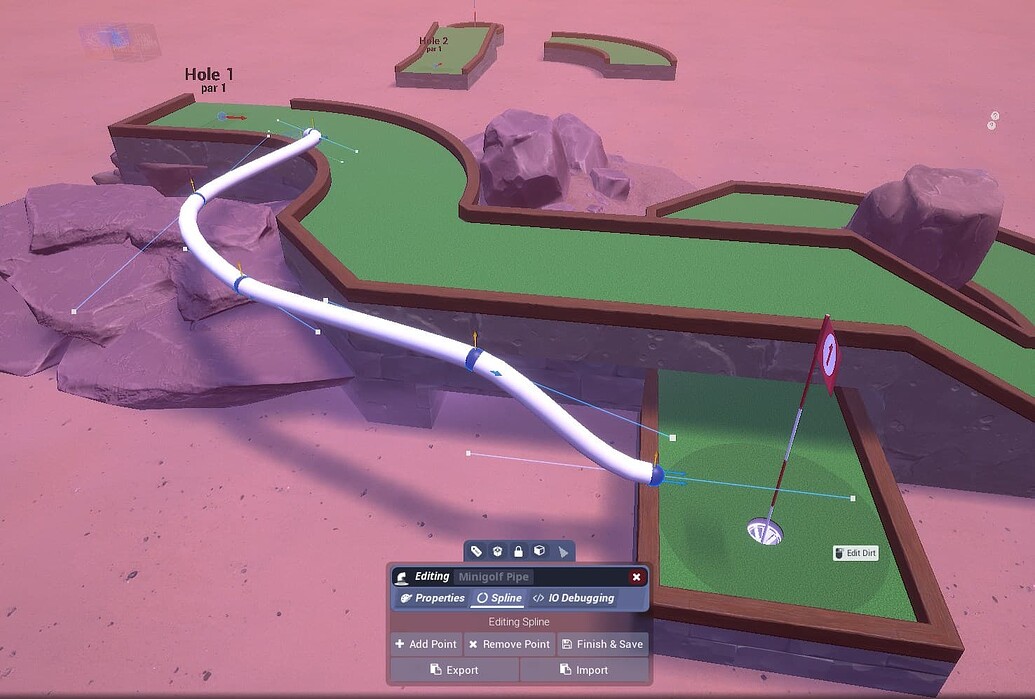
Pipes
Pipes travel a ball from one location to another.
At the start of the pipe there is a hidden box - which will grab any golf ball inside of it and put it into the pipe.
You can adjust how long it takes for the ball to travel through the pipe and how the ball pops out of the pipe.
Editing the pipe is done with the Spline Editor. See Working With The Spline Editor for more information.
Launchers & Bouncers
In many Minigolf maps, we use Launchers to bounce a ball from one place to another.
These items will travel the ball to a set location each time the ball hits them.
| Launcher | Description |
|---|---|
| Drum | A taiko drum that bounces the ball. |
| Gong | A gong that bounces the ball. |
| Geyser | A geyser that will launch balls into the air. |
| Pirate Cannon | A pirate cannon that launches the ball into the air. |
| Hidden | An invisible launcher. |
When editing launchers, you will see a blue arc that shows the path the ball will travel across.
Pirate Cannon
The pirate cannon is a little more complex than the other launchers.
In order load a golfball into the pirate cannon:
- you will need to place down a Pirate Cannon Entry Volume. This volume will load the golf ball into the connected cannon.
- connect the cannon to the entry volume by using the Connection Tool.
Once you have connected the two items together, the pirate cannon will function.
Friction Volume
Sometimes you'll need to adjust friction of the golf ball on the course. This can be useful to make surface slippery or brake the ball.
The Friction Volume (found in the Condo IO/Game Objects tab) will allow you to adjust the friction of the ball while it is inside the volume.
A higher friction value will make the ball stop sooner, while a lower friction volume will let the ball continue moving for longer (or forever).
Putt Volume
For more complex courses you may need to override putt settings.
The Putt Volume is a useful volume that overrides putt settings.
| Setting | Description |
|---|---|
| No Putting Allowed | Players cannot putt while inside this volume. |
| Don't Save Position | The ball will not save its position while inside this volume. This is useful to prevent the ball from returning back to an unsafe location after going out of bounds. |
| Don't Stop Motion | This will prevent the ball from ever stopping while inside this volume. Useful for moving platforms. |
| Can Putt While Moving | Allows players to putt even while moving while in the volume. Useful for moving platforms. |
Note About Movers
Minigolf works well with movers, but you will have to be careful with using movers for the playable courses.
If you have a moving piece or floor, the ball will oftentimes get stuck unable to putt while on the moving piece. This is very easy to fix by placing down a Putt Volume surrounding the moving area and setting the "Can Putt While Moving" setting to true. There is also the "Don't Stop Motion" setting which will prevent the ball from stopping while on a moving object as well.
Physics Spawner
Sometimes you want to have a barrel thrown onto the course like one of those old style games. With the Physics Spawner, found in the Condo IO/Game Objects tab, you can do exactly that.
The physics spawner has various settings to control how many physics you want to spawn, how often, how long the physics live for, and of course how fast you want them to eject out of the spawner.
Visuals/Decoration
Decoration
The Minigolf Map Maker supports any Condo item for decoration. Most Minigolf maps have a nature theme, so it's best to start looking at what Seasons store has decoration wise. You can browse Tower Express for items to get an idea of what's available. We plan to add more items from Minigolf courses that exist.
You can use anything a Condo can: canvases, primitives, lights, and even workshop models.
Sky Lighting / Weather
You can adjust the time of day, sun/moon position by pressing Tab then going to Map Settings > Day/Night & Weather
You can also adjust the weather, and the weather will save as the default for your map.
If you want even more control over the sky, place down a Sky Volume found in the Condo IO/Game Objects tab. The Sky Volume will allow you to adjust fog settings, horizon colors, and more.
Post Processing
You can adjust post process settings to enhance your level's atmosphere by placing down a Post Processing Volume found in the Condo IO/Game Objects tab.
Cameras
You can use Camera Volumes and the Camera IO item to setup custom cameras for certain gameplay needs. These items can be found in the Condo IO/Game Objects tab.
Static Camera
- Place down a Camera IO camera, which can be found in the Condo IO/Game Objects tab.
- Place down a Camera Volume somewhere on your course. Camera Volume can be found in the Condo IO/Game Objects tab.
- Use the Tower Glove: Connector Tool and wire the Camera IO item to the Camera Volume.
- And that's it! Now, when the golf ball overlaps with the Camera Volume, the Camera will activate, and when the ball leaves the volume the camera will deactivate.
If you are wanting to do cutscenes with your Cameras, please see the Camera Guide.
Following Camera
This camera will stay fixed but will follow the ball.
- Place down a Camera IO camera, which can be found in the Condo IO/Game Objects tab.
- Edit the Camera IO and check on Follow Player
- Place down a Camera Volume somewhere on your course. Camera Volume can be found in the Condo IO/Game Objects tab.
- Use the Tower Glove: Connector Tool and wire the Camera IO item to the Camera Volume.
Sounds
Just like in Condos, you can easily add sounds and sound atmosphere to your map.
There are two types of Sound Emitters: Sound Emitter, and Workshop Sound Emitter. They both share the same functionality, but the Workshop Sound Emitter will allow you to use custom sounds that have been uploaded to the Workshop Sound Pack workshop.
You can access both of these items in the Condo IO/Game Objects tab.
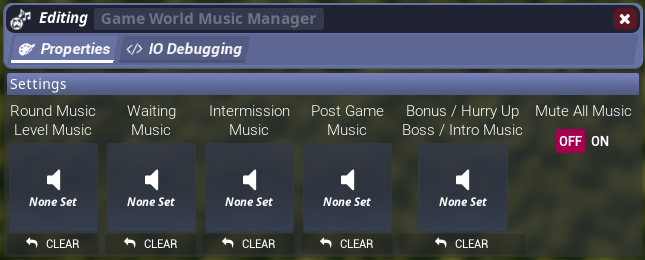
Music
Minigolf only has music for the waiting for players, customize, and hole intros (intermission).
To add your own custom music, spawn a Game World Music Manager, which can be found in the Condo IO/Game Objects tab.
Edit the Game World Music Manager and you will see music slots for each gameplay moment. You can override the music with any custom Workshop Sound Pack, or you can create your own.
Saving and Loading Maps
At any point of time, you can save your map to a file. You can then load this map at a later time.
The editor automatically saves your working map every so often, and before the game closes. But if you are working on multiple maps at once, you can save and load your maps to files.
To save/load your map, hold Tab and at the top of the scoreboard there is a Save button and a Load button.
Saving
Clicking on Save will ask you to provide a map name and then the editor will save your map.
Your maps are saved in the game's main folder /Tower Unite/Workshop/Maps/ and they are saved in a .map format. You can access this folder by opening Steam and right clicking on Tower Unite > Properties > Browse Local Files.
Loading
Clicking on Load will show a file prompt. If you do not see the file prompt - make sure you are in borderless or windowed mode as fullscreen is not compatible.
Loading From Condo Data
Did you happen to make your map in your Condo? You can load Condo map data just like a map.
First you will need to get your Condo save data. It is stored in:
C:\Program Files (x86)\Steam\userdata\ <SteamID3> \394690\remote\Condos\
where <SteamID3> the last part of your Steam ID. If you are the only Steam user who has used your machine, there should only be one folder. If you are not sure, you could try going by the last date modified.
There are folders for each Condo (ex. C_SmoothDirt) and inside of them there is a CondoData file. Copy that file to another folder, then rename the CondoData file to CondoData.map.
Once you have done that, you can import your condo data as a level!
We are hoping to streamline this process more in the future.
Testing Your Map
There are two ways to test your Minigolf map before releasing it. The Start Pad and a full test.
Testing with Start Pad
Each Start Pad has a way to quickly test your course. Simply press Use (default E) on the pad and you will enter the Minigolf ball. From there you can hit the ball around. This test mode supports out-of-bounds, pipes, and various volumes.
You can keep track of your strokes with the HUD (to help set your Par) and you can reset your ball back to the starting pad by pressing R.
Testing with Map Editor
You can also do a full map test to see how your map will work in actual Minigolf.
Hold Tab then click on on the big green Play button.
During testing, you can switch holes with the top left testing HUD. Simply hold Tab to enable your mouse to access it.
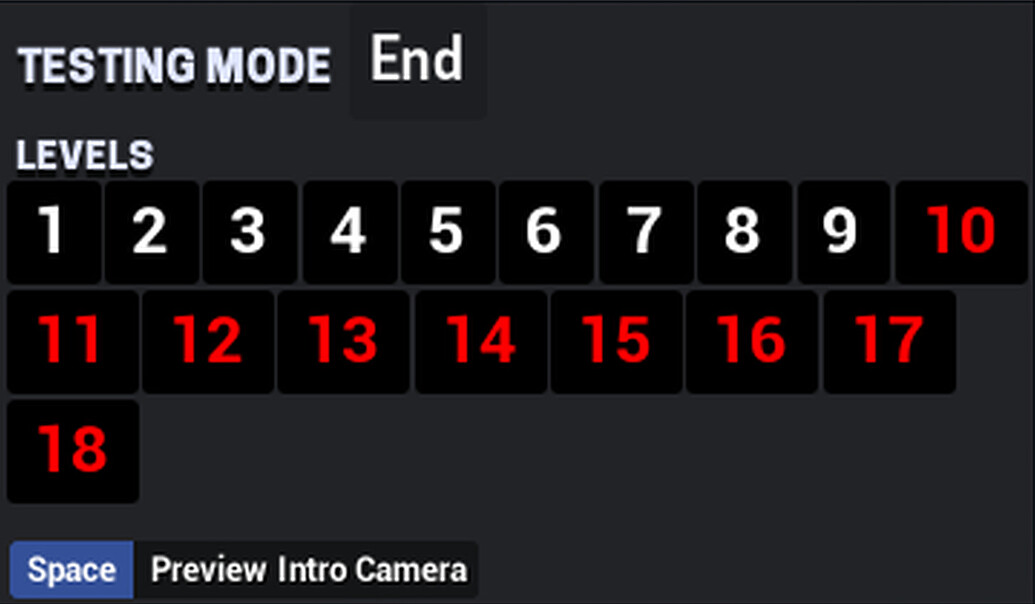
You can also quickly test the Intro Camera with Space.
After you are done testing, you can click on the End button and it will take you back to the editor.
Uploading Your Map
Uploading your map is the same process as uploading a Condo, but with a quick check process beforehand.
Hold Tab then click on on the Upload button.
Checking Your Map
Before you can upload your map, the editor will run a check of your map to ensure gameplay elements are there.
For Minigolf, it will check for:
9 Hole Course:
- at least 9 Start Pads and 9 Flag Holes
18 Hole Course:
- at least 18 Start Pads and 18 Flag Holes
You can manually check your map before uploading by holding Tab then clicking on on the Check Map button.
Uploading
After the check is completed, the upload panel will popup.
Click on Create New.

It will ask you to provide a file name to save your map as.

Name and Description
Follow the upload panel, it'll ask you to set a title for your map, along with a description.
Thumbnail and Images
Then, it'll ask you to take three screenshots, using the in-game photo screenshot tool.
If you want to upload a custom thumbnail, click on Set Thumbnail below the first image and select an image file. Thumbnails should be 800x400 resolution.
Tags
9 Hole and 18 Hole tags will automatically be applied based on your map data.
Select a Difficulty tag that best represents your map's difficulty. This can be updated in the future if you find out that players find your map easier or harder after they have played it.
Select a Map Theme. You can select up to three themes that best fit your map.
Content
If your map uses Canvases, the map editor will pack them with your map as textures. Look over these Canvases and ensure they do not break any of our Workshop Rules.
Upload
Finally, you are here. Take a deep breath. Be proud of what you have created. You have come so far, and now you can share your creation with the world! :confetti: :cheers: :party:
If you want to make your map immediately public, click the Publish & Make Public check box then hit upload, otherwise leave that unchecked and you can make it public from the published Workshop page.
You can update your map's title, description and images on the published Workshop page. Unfortunately, you cannot update your tags or thumbnail without doing an update to your map.
Upload Errors
If your map failed to upload to the Steam Workshop, it will give you an error message:
- Nothing: Sometimes this just happens. Try uploading once or twice again, before investigating further.
- Title / Description: Large bodies of text in the title or description field may prevent the upload. Keep it short or empty and you can update it freely afterwards.
- Maintenance / Downtime: Sometimes Steam Workshop is taken offline and will be unable to accept uploads. If this is the case, try again in 15 minutes, or so.
- Bans: If you have recently had an item removed from the Workshop, you may be limited by a temporary Workshop ban, even if it wasn't a Tower Unite item.
Updating Your Map
Updating your map is a similar process to uploading your map.
While in the level editor, hold Tab then click on on the Upload button.
After the check is completed, the upload panel will popup.
Click on Update Existing.
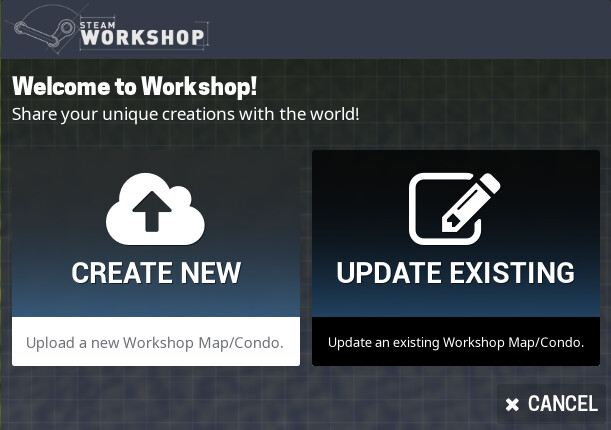
It will show a list of your uploaded maps. Click on the map you wish to update.
Then, it will ask you to provide a file name to save your map as. If you are just updating your thumbnail or tags, click on Skip Saving - Only Update Info.
At this point the upload panel will load all the existing information for your map.
Go through the upload panel step by step. You can skip updating certain parts of the update process if you do not want to update those.
When you have made your changes click on the Upload tab and click on Update.
Your map is now updated!
Payouts / Unit Approval
Newly uploaded maps by default will not have payouts enabled. This is to prevent abuse.
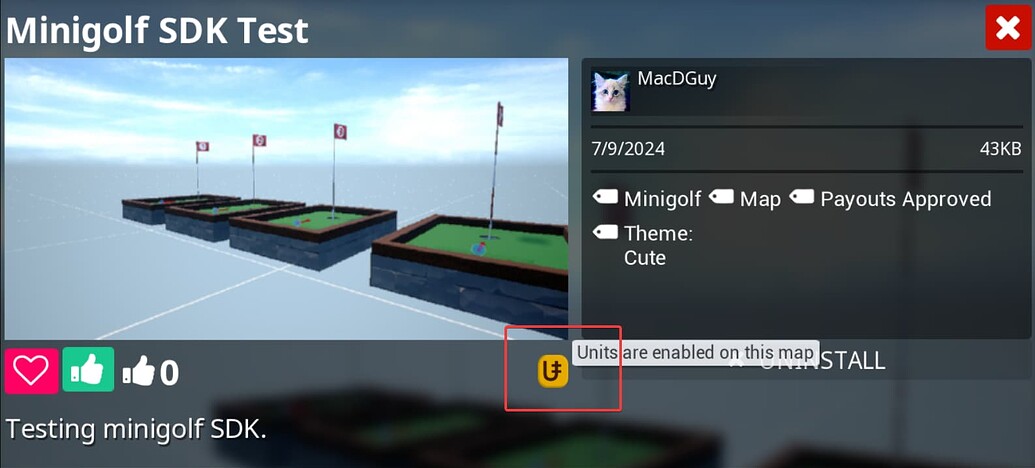
Each day, our staff will review newly published maps. If your map is approved for units payout, you will see a gold Unit symbol next to the map in-game for every workshop map list (including votemap).
If your map has not been approved, that might mean that is it too abusive or our staff has not reviewed it yet.
If you update your map after being approved, you will not need to be approved again. Staff can remove the approval if upon recent review the map needs further adjustments.
The approval process for Minigolf is done by:
- checking if the map is not a obvious Unit farm
- checking if the map has enough holes
- checking if the map's par counts are set
- checking if the map has proper out of bounds
- checking if the map is complete-able and playable
Closing Statements
This editor uses multiple features that have been in development for several years and will only continue to improve and grow.
We are very excited to see what you come up with! Have fun, and see you on the greens!