Creating Items
All of the editor tools are embedded in-game.
To access the item editor, go to the Main Menu of Tower Unite. Near the bottom, there is a Workshop Editor option. From there, click on Player Model/Item Creation.
We assume in this guide that you have prior knowledge with 3D modeling.
Step 1. Exporting
Assuming you have a model already ready to go, you just need to export it to a format Tower Unite accepts. For items, we allow importing DAE, FBX, OBJ, and SMD!
Textures
For textures, store the files in the same folder as your model file. The game will search for them when importing and assign them based on the naming format.
The supported material maps and their associated names are as follows:
Diffuse maps: <Material Slot Name>_Diffuse.<file type>
Normal maps: <Material Slot Name>_Normal.<file type>
Height maps: <Material Slot Name>_Height.<file type>
So if you had a material called "Bench" for your model, and you used .pngs, your textures would look like:
Bench_Diffuse.png
Bench_Normal.png
Bench_Height.png
The importer will inform you if your texture files are missing. It is not required to have a Normal or Height texture, but the model importer will warn you if they are missing.
Please make sure you have setup your materials and pointed the textures to the correct file paths BEFORE you export!
You cannot edit these paths after importing. So make absolutely sure you are pointing to valid files or you will have missing textures when you go to import!
Step 2. Importing into Tower Unite
Once you have exported the model into an accepted format, it's finally time to open up Tower Unite and load the Workshop Editor!
To access the item editor, go to the Main Menu of Tower Unite. Near the bottom, there is a Workshop Editor option. From there, click on Player Model/Item Creation.
Once in the editor:
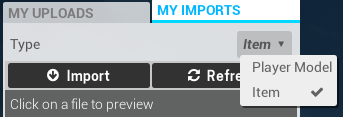
- Select the My Imports tab.
- Select Item from the dropdown.
- Click Import.
- Select the model you wish to import.
- That's it!
Your model will then be converted into our format (.model). If it fails for any reason, the editor will tell you why in the Compiler Info. You can also see the entire import process there and troubleshoot any issues that come up.
You can reimport over and over until you get the perfect item!
All items have auto generated convex collisions.
Step 3. Metadata
You can edit your item for Tower Unite specific features using the metadata editor.
The item metadata editor allows you to adjust the scale of the model. This is useful for quick scale fix-ups, but it's preferred to adjust the scale of the model during the import process.
You can also adjust material properties from the metadata editor as well.
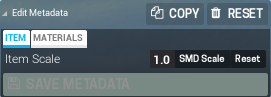
Once you are done editing the metadata, just hit Save Metadata and when you upload your model, it'll all be included for you!
Material Metadata
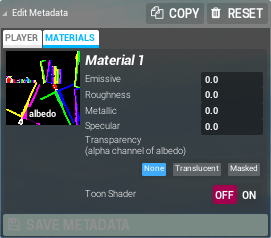
You can adjust the material settings using the metadata editor.
- Emissive: Adjusts how much the material glows in the dark.
- Roughness: Adjusts how smooth reflections are.
- Metallic: Adjusts how much the material is metal.
- Specular: Adjusts how reflective the material is.
- Transparency: Adjusts if the material is partially translucent or masked (masked takes in lighting and does not have as many visual sorting issues)
- Toon Shader: Applies a cartoon effect on the material.
Step 4. Publishing
To publish your item, select the My Imports tab, select the Type dropdown and make sure that Item is selected.
Once you have done this, you will see a list of all of your imported models.
Find the vehicle that you wish to upload, and click on its name. On the right, click on the big blue Upload button. From there, you will see the upload panel.
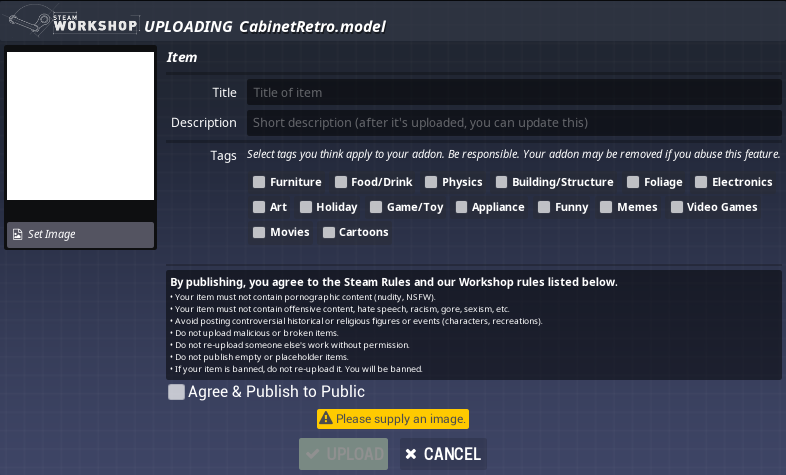
Fill out the necessary information, tag your item type, and follow our rules.
Once you have filled out all the information, simply click Upload, and the editor will upload to Steam Workshop.
If you want to make your item immediately public, click the Publish & Make Public check box then hit upload, otherwise leave that unchecked and you can make it public from the published Workshop page.
You can update your item's title, description and images on the published Workshop page. Unfortunately, you cannot update your tags or thumbnail without doing an update to your item.
Upload Errors
If your item failed to upload to the Steam Workshop, it will give you an error message:
- Nothing: Sometimes this just happens. Try uploading once or twice again, before investigating further.
- Title / Description: Large bodies of text in the title or description field may prevent the upload. Keep it short or empty and you can update it freely afterwards.
- Maintenance / Downtime: Sometimes Steam Workshop is taken offline and will be unable to accept uploads. If this is the case, try again in 15 minutes or so.
- Bans: If you have recently had an item removed from the Workshop, you may be limited by a temporary Workshop ban, even if it wasn't a Tower Unite item.
Video Tutorial
Updating
To update an existing workshop item, while in the item editor, click the My Uploads tab.
From there, you will see a list of your uploaded workshop addons. If you do not see any uploaded Workshop addons, check if you are properly connected to Steam or click Get My Uploads.
Find the item you want to update, and click on its name. An update dialog will open up, and will automatically populate with existing information for the item for you.
From here, you can update the title, the image, tags, and the file.
To update the model, click on Select File To Update and select the file from the list that pops up.
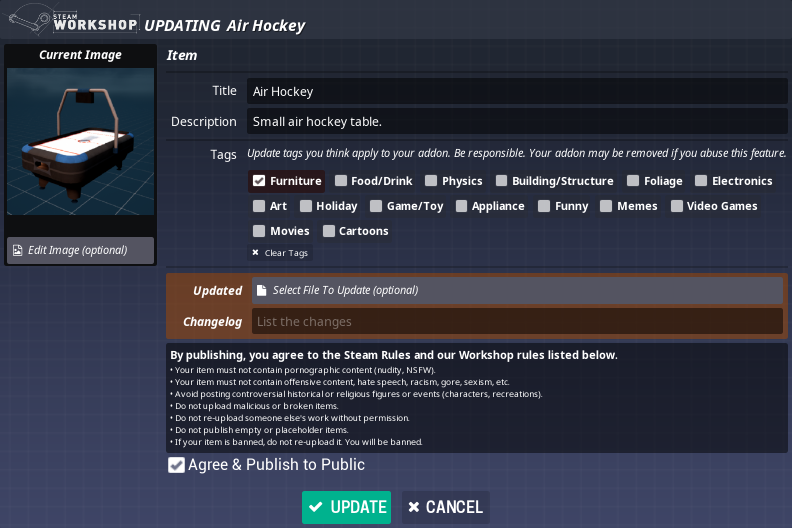
Once you are done with your changes, click Update, and the editor will send the changes to Steam Workshop.
You may have to clear your workshop cache and restart Tower Unite to see the update.
Example
Example License
1.0 License Grant. Owner grants you a limited, royalty-free, non-exclusive worldwide license to make non-commercial use of the art assets and other content included in the Package.2.0 Limitations. The license granted above has the following limitations: 2.1 This license only allows you to make non-commercial use of the Package solely in connection with the Tower Unite software (the “Software”). 2.2 Remember, only non-commercial usage - If you charge money (or take anything else of value) in connection with the usage of the Package or anything related to your usage of the Software (such as charging for the use of servers running the Software), or sell any virtual currency or virtual items in connection with the Package or the Software, this is strictly prohibited and is a violation of this license; 2.3 You may only copy, duplicate, or reproduce the Package in accordance with this license and only in the form in which it was originally distributed by Owner, including this license file, and any distribution must be under this same license; 2.4 You may not remove or alter any copyright or trademark notices, or any license files, that appear anywhere within the Package or its contents.
3.0 Ownership. You agree that Owner is the sole owner of all rights to the Package, its contents, and any derivatives of such, and these rights are protected by copyright and other intellectual property laws and international treaties.
4.0 Termination. Owner may, at its sole discretion, terminate this license if you fail to follow the terms of this Agreement. If Owner terminates this license, you agree to cease all use of the Package, and to delete any copies and cease all distribution of the Package.
5.0 Support. You agree that Owner is not required to provide any customer or technical support with regard to the Package.
6.0 Warranties; Limitation of Liability. 6.1 No Warranties. Owner expressly disclaims any warranty in, to, or for the Package. The Package is provided ‘As Is’ and ‘Where Is’ without any express or implied warranty of any kind. OWNER EXPRESSLY DISCLAIMS ANY WARRANTIES OF MERCHANTABILITY, FITNESS FOR A PARTICULAR PURPOSE, NON-INFRINGEMENT, OR CONTINUOUS OPERATION. The entire risk associated with operation of the Package is assumed by you. Owner does not warrant or assume responsibility for the accuracy or completeness of any information, text, graphics, links or other items contained within the Package. Owner makes no warranties respecting any harm that may be caused by the transmission of a computer virus, worm, time bomb, logic bomb, or other such computer program. Owner further expressly disclaims any warranty or representation to any third party who may operate or otherwise utilize the Package. Owner cannot guarantee the integrity of the Package or that it will be free from attacks by third parties that may result in incomplete or erroneous results from operation, or damage to hardware devices in which the Package is loaded and operating. 6.2 Limitation of Liability. IN NO EVENT WILL OWNER, OR THEIR EMPLOYEES, AGENTS, CONTRACTORS, SUPPLIERS, OR LICENSEES BE LIABLE FOR ANY INDIRECT, PUNITIVE, SPECIAL, INCIDENTAL OR CONSEQUENTIAL DAMAGE (INCLUDING BUT NOT LIMITED TO LOSS OF BUSINESS, REVENUE, PROFITS, USE, DATA OR OTHER ECONOMIC ADVANTAGE), HOWEVER THEY ARISE, WHETHER IN AN ACTION OF CONTRACT, NEGLIGENCE OR OTHER TORTIOUS ACTION, OR ARISING OUT OF OR IN CONNECTION WITH THE USE OR INABILITY TO USE THE PACKAGE, EVEN IF OWNER HAS BEEN PREVIOUSLY ADVISED OF THE POSSIBILITY OF SUCH DAMAGE. Because some states or jurisdictions do not allow the exclusion or the limitation of liability for consequential or incidental damages, in such states or jurisdictions, the liability of Owner and its affiliates will be limited to the fullest extent permitted by law.